Difference between revisions of "Bombing"
(→The Stealth Bomber Fleet) |
|||
| Line 22: | Line 22: | ||
Before executing any kind of squadron tactics – make sure that you (the commander) have assigned a common damage type for bombs for the squad(s) to allow for maximum damage output. Where possible use the strengths of your bombers. For example; you have 3 Hounds and 2 Manticores in your squad – you may want to consider going with Shrapnel bombs to accentuate the DPS bonuses the majority of your pilots (Hound pilots). | Before executing any kind of squadron tactics – make sure that you (the commander) have assigned a common damage type for bombs for the squad(s) to allow for maximum damage output. Where possible use the strengths of your bombers. For example; you have 3 Hounds and 2 Manticores in your squad – you may want to consider going with Shrapnel bombs to accentuate the DPS bonuses the majority of your pilots (Hound pilots). | ||
| − | |||
| − | |||
==Navigation Basics== | ==Navigation Basics== | ||
| Line 40: | Line 38: | ||
##Each pilot in a bomber squadron needs to recognize when the enemy is on an intercepting vector with their ship and should have the wherewithal to get out as necessary. | ##Each pilot in a bomber squadron needs to recognize when the enemy is on an intercepting vector with their ship and should have the wherewithal to get out as necessary. | ||
| − | + | We will now begin a review of three bomber squadron tactics developed by Agony pilots, take them, learn them, and adapt them to make them better – it’s what we do! | |
| − | + | ||
Revision as of 20:36, 26 October 2010
| This article is currently under construction and the content is subject to change. Once the article has passed the peer review process please remove this template from the article body. |
Contents
The Stealth Bomber Fleet
There are a myriad of individual tactics for bombers, this article focuses on some group tactics and the advantages and disadvantages of each, and it is by no means a comprehensive list.
Before executing any kind of squadron tactics – make sure that you (the commander) have assigned a common damage type for bombs for the squad(s) to allow for maximum damage output. Where possible use the strengths of your bombers. For example; you have 3 Hounds and 2 Manticores in your squad – you may want to consider going with Shrapnel bombs to accentuate the DPS bonuses the majority of your pilots (Hound pilots).
Moving stealth bombers the right way through Eve space is challenging. As the commander of a bomber squadron it is your job to ensure the element of surprise is kept at all costs. Keep these rules in mind and you can mitigate the risk of blowing your cover.
- Before you start for the roam, assign default warp to distances for each pilot.
- KISS (Keep it simple stupid) use the fleet window to dictate who gets assigned what distance and use uniform multipliers. I generally use a distance of 7km per pilot.
- Remind the pilots that once the default is set the “Warp to (object)” option on the right click menu will use that warp to distance – warping to Zero on an object just got harder!
- Remind Pilots that warp to distances may change throughout the evening when new pilots join the ranks or when tactics are adjusted. BE VIGILANT!
- Where possible, you should be cloaked.
- Setup a default order on/in systems to re-establish cloak
- Review the MWD/AB + Cloak maneuver with the group.
- Give the enemy Prober nothing and take from them everything.
- Explain the concept of self preservation
- Each pilot in a bomber squadron needs to recognize when the enemy is on an intercepting vector with their ship and should have the wherewithal to get out as necessary.
We will now begin a review of three bomber squadron tactics developed by Agony pilots, take them, learn them, and adapt them to make them better – it’s what we do!
The Fly By
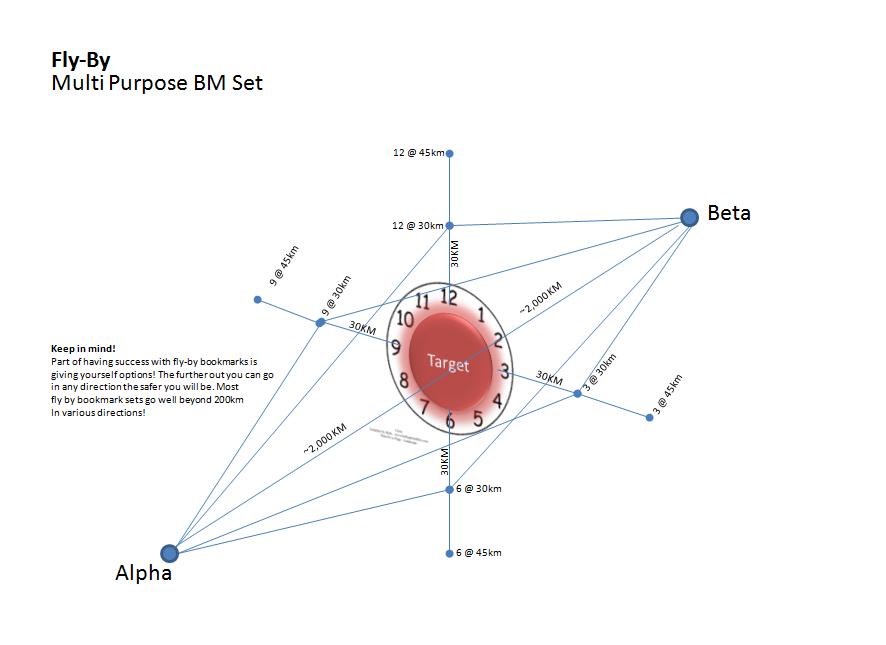
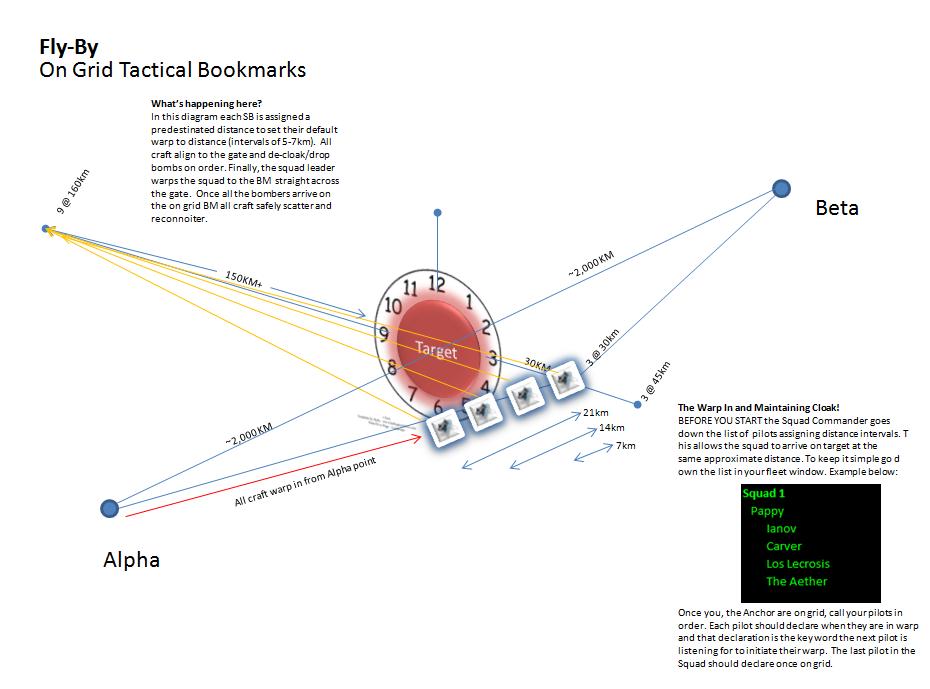
The Agony Fly-By tactic has a basis with a set of bookmarks off a celestial, in most cases a gate. The tactic includes one Alpha and one Beta point at opposite ends of the gate 4,000km+ from each other. Additionally, there are a series of BMs radiating off the celestial at various clock positions and distances. The clock is always read as if the pilot were at the alpha point. For more information on making fly-by bookmarks please read this comprehensive article.
A basic overview of the fly by maneuver elements is below.
Setting up the Fly By bookmarks takes approximately 30 minutes per celestial resulting in 35-45 possible bookmarks off the gate from at least four vectors. I recommend using a fast cheap ship (such as a Vigil) to create the Alpha and Beta points, and a SB or other Black-Ops ship to make the clock positions (traveling cloaked).
Once you have a set of fly-by bookmarks off a gate you can use a couple different tactics with your squadron of bombers with relative safety and efficiency. A note about fittings: when using Fly-By bookmarks for bombing runs you want your bombers to have a relatively short align time – modules like Nanofiber Internal Structure and Low Friction Nozzle Joints (rig) are great for this.
Alpha to Beta Exit
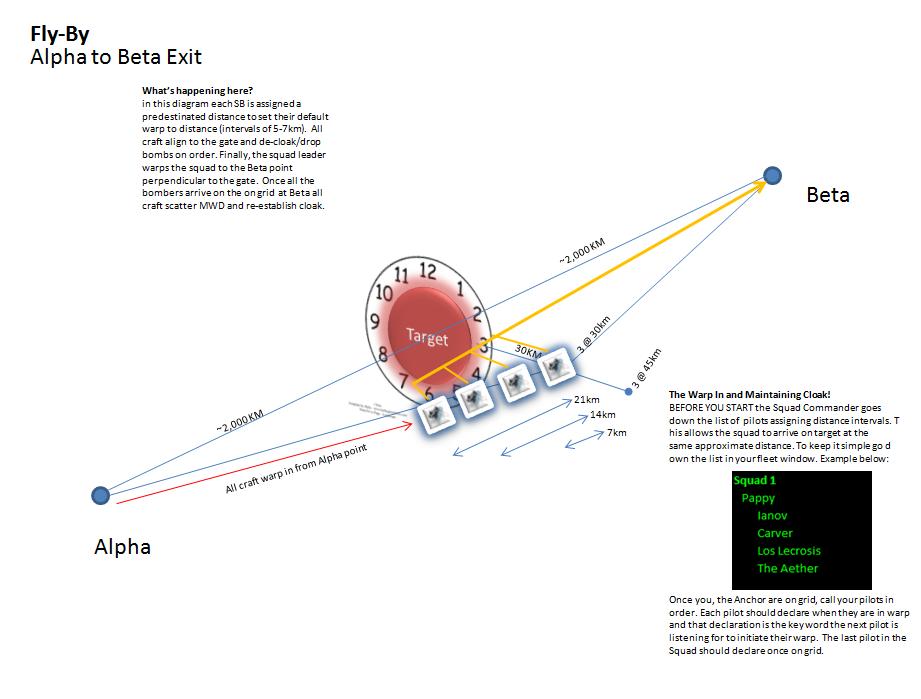
The first tactic we will discuss is the standard fly by bombing run. I’ve removed some of the unnecessary diagram details to show the bare-bones of the tactic. Let run through it step by step….
The Setup
In the setup the FC needs to have set the warp to distances for each of his bombers. Per the note above keep it simple – black ops on its face are complicated enough. The FC will need to get his gang to the Alpha point (or Beta point) – this is a great place to test your designated distances and make sure everyone is set. If you (the FC) warp to the Alpha and have your crew warp to you at distance, anyone not following instructions will get de-cloaked very quickly – identifying a rather embarrassing mistake early you can correct.
Once all the bombers are in position the on grid setup can be executed. As the owner of the fly-by tactic you will act as the Anchor for the setup. When ready warp yourself to the gate at one of your on grid tactical – in this case we are going to use the 3 o’clock position at 30km from gate. Once you arrive on grid you should assess the situation:
- Is this BM in danger of being busted by light orbiting craft?
- Is this a good angle of attack?
- Scroll out…is there a better location on grid we can use?
- If so, move back to alpha and head over to it!
Do not talk yourself out of every situation, but keep in mind it will take some time to setup so make sure you are giving yourself the best available chance to execute. Remember once you drop bombs the gig is up – you rarely get a second shot.Once you arrived at a suitable location start calling in your crew. Again you are going to keep it simple and just go down the list in your fleet window, which should match up to the distance assignments.
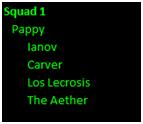
Above is my fleet window (or a crude approximation) and before I started my roam I assigned Ianov 7km, Carver 14km, Los 21km, and The Aether 28km. As the anchor, I’m going to call in the first pilot and the rest should fall in like dominoes. Each pilot should follow the preceding pilot into warp once that pilot calls that they are in warp. We do this to avoid passing through each other and risking de-cloaking.
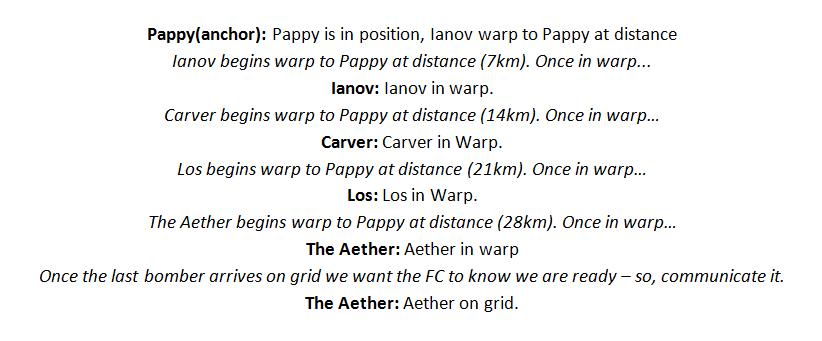
In our example the dialogue should go something like this, please notice the use of the third person…
At the end of this exchange we now have all of our bombers on grid with the gate, still cloaked, and approximately 30km from target - setup complete.
The Bombing Run
The stage is set: the bombers are within optimal range and no one knows you are there. Again, for this tactic we will be using the Beta point from our Fly by bookmarks as our exit point, perpendicular to the target. Before you pull the trigger communicate to your squad if they will be warping themselves off grid or if you will be taking care of a squad warp. More commonly will be you warping the squad as a whole.
Once your target(s) of choice arrive on gate, Slow Align your squad towards the target (most likely the gate or something being attacked near the gate). As the commander you will be calling the order to de-cloak and to drop bombs, check your overview for the appropriate number of bombs, and immediately warp the squad off to the Beta point – BOOM!
Not over yet! Before the squad arrives on grid at the Beta point remind the pilots once you arrive on grid to burn off in a random direction and reestablish cloak. This will mitigate getting discovered by an unfriendly Prober and give you some time to access the situation, check for losses/kill-mails etc.
Once your bomber module time has reset (120 seconds) you can rinse and repeat from a different angle!
On Grid Tactical Exits
The second tactic using fly-by bookmarks uses an identical setup procedure to the above tactic, however instead of exiting perpendicular to the target and landing OFF-grid, you will be exiting through the target and landing ON-grid.
The Setup
Again, the setup is identical to the tactic above please reference the above pages.
The Bombing Run
This round we will be using one of our fly-by bookmarks directly across gate exit point, parallel to the target. Your selected exit bookmark should be directly across the gate from your current location and at a sufficient distance to you to allow warping (150km minimum, but I use ~170km as a rule to compensate for drift). So in our example above our squadron is at the 3 o’clock position 30km from the target, as the FC I want to pick a fly-by exit point directly across gate (the 9 o’clock position) and at sufficient distance. Warping us to 9 o’clock @ 120km might work, however any bombers closer than 30km from the gate is likely to be left behind (< 150km from destination). Give yourself some room ~ 10-20km at least and more if you can. So, in our example I would warp the squad to at least 9 o’clock @ 140km to ensure I get all my birds out of danger, making the total distance to exit ~170km.
Reminder - before you pull the trigger communicate to your squad if they will be warping themselves off grid or if you will be taking care of a squad warp. More commonly will be you warping the squad as a whole as you have most of the bookmarks. Once your target(s) of choice arrive on gate, Slow Align your squad towards the target (most likely the gate or something being attacked near the gate). As the FC you will be calling the order to de-cloak and to drop bombs. Call for the gang to de-cloak and drop bombs. Check your overview for the appropriate number of bombs- and immediately warp the squad off to the Fly-by bookmark point.
Now because you are still on grid we still have work to do, before the squad arrives on at the on-grid tac you will need to be thinking off an off grid exit point (usually an Alpha/Beta) . Once the squad lands on the on-grid tactical you can warp everyone off to the off grid bookmark. Remind the pilots once you exit warp to burn off in a random direction and reestablish cloak to mitigate discovery. Once your bomb timer has reset (120 seconds) you can rinse and repeat from a different angle, 12:00 to 6:00, 9:00 to 3:00, 2:00 to 8:00, 10:00 to 5:00, the list goes on and on.
Conclusion
The fly by tactics is geared towards gate camp busting. It is versatile enough that a competent commander could place multiple squads at various points around the clock (12, 3, 6, 9, etc) and take down very large fleets given the right situation. Look for opportune moments when your opponent is most vulnerable; for instance when a large fleet enters your system/gate you are setup on and start a hard burn (MWD on) back to gate – bombing then maximizes your DPS.
Advanced Tactics:Fishing with Fly-Bys: It can also be used to fish your opponent(s) off gate by placing a bait target at the 45km bookmark and the bombers at the 80km bookmark (or any distances 30-40 km apart but in-line) on any one clock position. When the target(s) begin burning up to the target a set of well timed bombs is sure to give them a bad day.
Some advantages of this tactic:
- Highly adjustable to the situation – multiple angles possible.
- Great for getting around bubbled gates.
- Fast Setup Time
- Utilizing a comprehensive set of BMs that should already be part of an Agony pilot’s arsenal.
Some disadvantages of this tactic
- Slow initial setup time to create fly-by bookmarks
- When using the Beta exit the perpendicular exit point leaves you venerable to long range points while you align.
The Claw
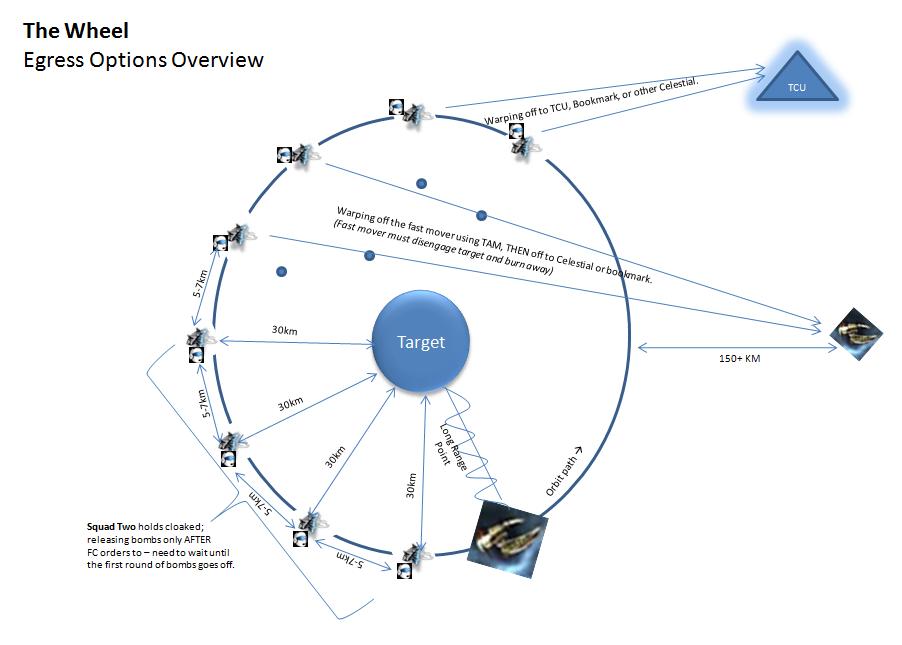
So having fly-by bookmarks is great, however they do require a time investment and it’s just not practical to expect a pilot to remain sane AND have the entire region bookmarked to that degree. This poses the question, “How can you use bombers efficiently in non-bookmarked space?” a question I hope the next two tactics will shed some light on.
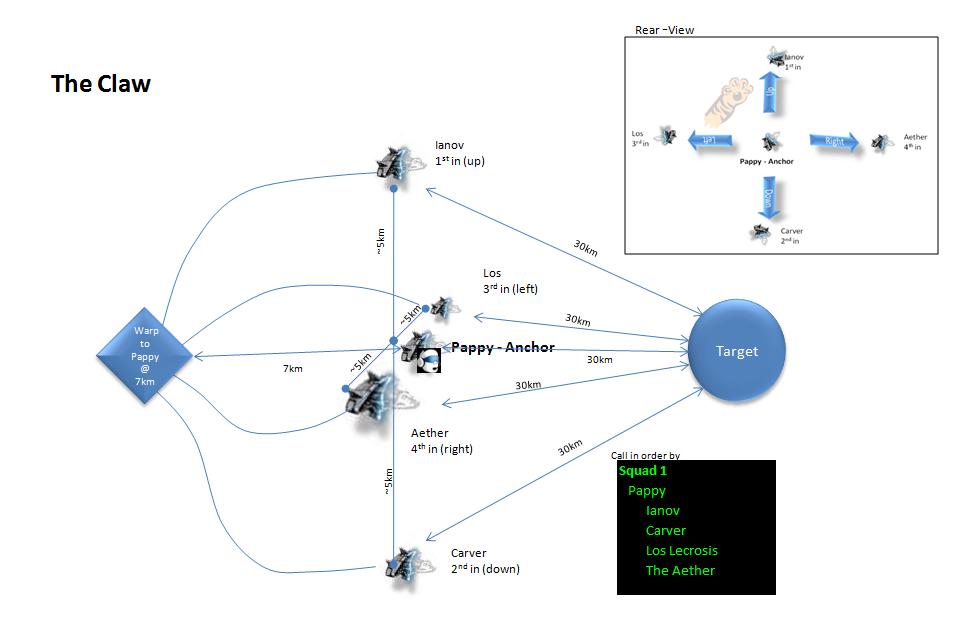
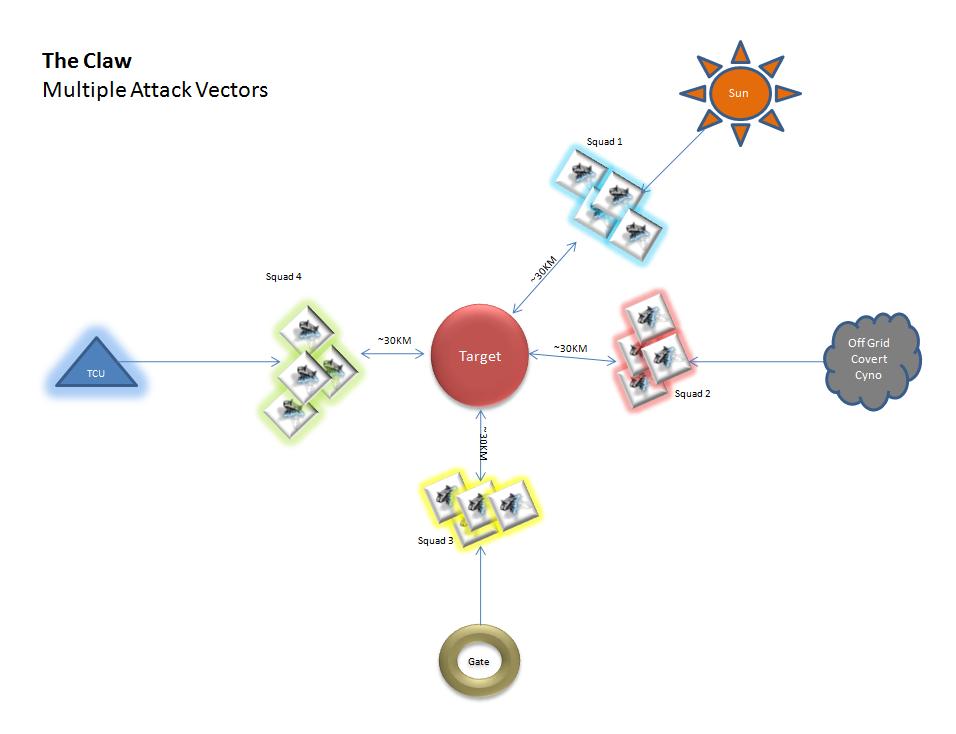
The Claw is designed to get multiple squads onto a target in an orderly fashion from various vectors. By replacing preset bookmarks with manual flying techniques - it trades setup time for safety and firepower but is highly reliant on manual flying and situational awareness.
The Setup
As soon as you know you will be using this tactic the first point of order is to have all pilots reset their default warp to distances to 7km. Timing the calls, order of the calls.
The Bombing Run
Body text Here
Conclusion
The Danger Close
Roles: Fast Mover, The Prober,
The Setup
Position on the target, speed, timing the calls, order of the calls.
The Bombing Run
Exit points, TAM, Celestials,
