Difference between revisions of "Bombing"
| Line 15: | Line 15: | ||
<!-- ********** @Pappy: Start your editing below this line :) ********** --> | <!-- ********** @Pappy: Start your editing below this line :) ********** --> | ||
| − | + | Last Updated by: --[[User:Pappy Stirling|Pappy Stirling]] 14:04, 28 October 2010 (CDT) | |
| − | + | ||
=The Stealth Bomber Fleet= | =The Stealth Bomber Fleet= | ||
| Line 53: | Line 52: | ||
| − | We will now begin a review of three bomber squadron tactics developed by Agony pilots, take them, learn them, and adapt them to make them better – it’s what we do! | + | '''We will now begin a review of three bomber squadron tactics developed by Agony pilots, take them, learn them, and adapt them to make them better – it’s what we do! |
| + | ''' | ||
| − | + | =The Fly By= | |
| − | + | ||
The Agony Fly-By tactic has a basis with a set of bookmarks off a celestial, in most cases a gate. The tactic includes one Alpha and one Beta point at opposite ends of the gate 4,000km+ from each other. Additionally, there are a series of BMs radiating off the celestial at various clock positions and distances. The clock is always read as if the pilot were at the alpha point. For more information on making fly-by bookmarks please read [http://www.agony-unleashed.com/wiki/index.php?title=Flyby_Sniping_Maneuvers_in_PvP this comprehensive article]. | The Agony Fly-By tactic has a basis with a set of bookmarks off a celestial, in most cases a gate. The tactic includes one Alpha and one Beta point at opposite ends of the gate 4,000km+ from each other. Additionally, there are a series of BMs radiating off the celestial at various clock positions and distances. The clock is always read as if the pilot were at the alpha point. For more information on making fly-by bookmarks please read [http://www.agony-unleashed.com/wiki/index.php?title=Flyby_Sniping_Maneuvers_in_PvP this comprehensive article]. | ||
| Line 69: | Line 68: | ||
Once you have a set of fly-by bookmarks off a gate you can use a couple different tactics with your squadron of bombers with relative safety and efficiency. A note about fittings: when using Fly-By bookmarks for bombing runs you want your bombers to have a relatively short align time – modules like Nanofiber Internal Structure and Low Friction Nozzle Joints (rig) are great for this. | Once you have a set of fly-by bookmarks off a gate you can use a couple different tactics with your squadron of bombers with relative safety and efficiency. A note about fittings: when using Fly-By bookmarks for bombing runs you want your bombers to have a relatively short align time – modules like Nanofiber Internal Structure and Low Friction Nozzle Joints (rig) are great for this. | ||
| − | + | ==Alpha to Beta Exit== | |
The first tactic we will discuss is the standard fly by bombing run. I’ve removed some of the unnecessary diagram details to show the bare-bones of the tactic. Let run through it step by step…. | The first tactic we will discuss is the standard fly by bombing run. I’ve removed some of the unnecessary diagram details to show the bare-bones of the tactic. Let run through it step by step…. | ||
| Line 75: | Line 74: | ||
[[Image:AtoBExit.jpg]] | [[Image:AtoBExit.jpg]] | ||
| − | + | ===The Setup=== | |
In the setup the FC needs to have set the warp to distances for each of his bombers. Per the note above keep it simple – black ops on its face are complicated enough. The FC will need to get his gang to the Alpha point (or Beta point) – this is a great place to test your designated distances and make sure everyone is set. If you (the FC) warp to the Alpha and have your crew warp to you at distance, anyone not following instructions will get de-cloaked very quickly – identifying a rather embarrassing mistake early you can correct. | In the setup the FC needs to have set the warp to distances for each of his bombers. Per the note above keep it simple – black ops on its face are complicated enough. The FC will need to get his gang to the Alpha point (or Beta point) – this is a great place to test your designated distances and make sure everyone is set. If you (the FC) warp to the Alpha and have your crew warp to you at distance, anyone not following instructions will get de-cloaked very quickly – identifying a rather embarrassing mistake early you can correct. | ||
| Line 98: | Line 97: | ||
At the end of this exchange we now have all of our bombers on grid with the gate, still cloaked, and approximately 30km from target - setup complete. | At the end of this exchange we now have all of our bombers on grid with the gate, still cloaked, and approximately 30km from target - setup complete. | ||
| − | + | ===The Bombing Run=== | |
The stage is set: the bombers are within optimal range and no one knows you are there. Again, for this tactic we will be using the Beta point from our Fly by bookmarks as our exit point, perpendicular to the target. ''Before you pull the trigger'' communicate to your squad if they will be warping themselves off grid or if you will be taking care of a squad warp. More commonly will be you warping the squad as a whole. | The stage is set: the bombers are within optimal range and no one knows you are there. Again, for this tactic we will be using the Beta point from our Fly by bookmarks as our exit point, perpendicular to the target. ''Before you pull the trigger'' communicate to your squad if they will be warping themselves off grid or if you will be taking care of a squad warp. More commonly will be you warping the squad as a whole. | ||
| Line 107: | Line 106: | ||
Once your bomber module time has reset (120 seconds) you can rinse and repeat from a different angle! | Once your bomber module time has reset (120 seconds) you can rinse and repeat from a different angle! | ||
| − | + | ==On Grid Tactical Exits== | |
The second tactic using fly-by bookmarks uses an identical setup procedure to the above tactic, however instead of exiting perpendicular to the target and landing OFF-grid, you will be exiting through the target and landing ON-grid. | The second tactic using fly-by bookmarks uses an identical setup procedure to the above tactic, however instead of exiting perpendicular to the target and landing OFF-grid, you will be exiting through the target and landing ON-grid. | ||
[[Image:Ongridfb.jpg]] | [[Image:Ongridfb.jpg]] | ||
| − | + | ===The Setup=== | |
Again, the setup is identical to the tactic above please reference the above pages. | Again, the setup is identical to the tactic above please reference the above pages. | ||
| − | + | ===The Bombing Run=== | |
This round we will be using one of our fly-by bookmarks directly across gate exit point, parallel to the target. Your selected exit bookmark should be directly across the gate from your current location and at a sufficient distance to you to allow warping (150km minimum, but I use ~170km as a rule to compensate for drift). So in our example above our squadron is at the 3 o’clock position 30km from the target, as the FC I want to pick a fly-by exit point directly across gate (the 9 o’clock position) and at sufficient distance. Warping us to 9 o’clock @ 120km might work, however any bombers closer than 30km from the gate is likely to be left behind (< 150km from destination). Give yourself some room ~ 10-20km at least and more if you can. So, in our example I would warp the squad to at least 9 o’clock @ 140km to ensure I get all my birds out of danger, making the total distance to exit ~170km. | This round we will be using one of our fly-by bookmarks directly across gate exit point, parallel to the target. Your selected exit bookmark should be directly across the gate from your current location and at a sufficient distance to you to allow warping (150km minimum, but I use ~170km as a rule to compensate for drift). So in our example above our squadron is at the 3 o’clock position 30km from the target, as the FC I want to pick a fly-by exit point directly across gate (the 9 o’clock position) and at sufficient distance. Warping us to 9 o’clock @ 120km might work, however any bombers closer than 30km from the gate is likely to be left behind (< 150km from destination). Give yourself some room ~ 10-20km at least and more if you can. So, in our example I would warp the squad to at least 9 o’clock @ 140km to ensure I get all my birds out of danger, making the total distance to exit ~170km. | ||
| Line 121: | Line 120: | ||
Now because you are still on grid we still have work to do, before the squad arrives on at the on-grid tac you will need to be thinking off an off grid exit point (usually an Alpha/Beta) . Once the squad lands on the on-grid tactical you can warp everyone off to the off grid bookmark. Remind the pilots once you exit warp to burn off in a random direction and reestablish cloak to mitigate discovery. Once your bomb timer has reset (120 seconds) you can rinse and repeat from a different angle, 12:00 to 6:00, 9:00 to 3:00, 2:00 to 8:00, 10:00 to 5:00, the list goes on and on. | Now because you are still on grid we still have work to do, before the squad arrives on at the on-grid tac you will need to be thinking off an off grid exit point (usually an Alpha/Beta) . Once the squad lands on the on-grid tactical you can warp everyone off to the off grid bookmark. Remind the pilots once you exit warp to burn off in a random direction and reestablish cloak to mitigate discovery. Once your bomb timer has reset (120 seconds) you can rinse and repeat from a different angle, 12:00 to 6:00, 9:00 to 3:00, 2:00 to 8:00, 10:00 to 5:00, the list goes on and on. | ||
| − | + | ==Conclusion== | |
The fly by tactics is geared towards gate camp busting. It is versatile enough that a competent commander could place multiple squads at various points around the clock (12, 3, 6, 9, etc) and take down very large fleets given the right situation, however fleets nowadays are unlikely to stay on one gate for very long. Look for opportune moments when your opponent is most vulnerable; for instance when a large fleet enters your system/gate you are setup on and start a hard burn (MWD on) back to gate – bombing then maximizes your DPS. | The fly by tactics is geared towards gate camp busting. It is versatile enough that a competent commander could place multiple squads at various points around the clock (12, 3, 6, 9, etc) and take down very large fleets given the right situation, however fleets nowadays are unlikely to stay on one gate for very long. Look for opportune moments when your opponent is most vulnerable; for instance when a large fleet enters your system/gate you are setup on and start a hard burn (MWD on) back to gate – bombing then maximizes your DPS. | ||
| Line 142: | Line 141: | ||
| − | + | =The Claw= | |
So having fly-by bookmarks is great, however they do require a time investment and it’s just not practical to expect a pilot to remain sane AND have the entire region bookmarked to that degree. This poses the question, “How can you use bombers efficiently in non-bookmarked space?”. | So having fly-by bookmarks is great, however they do require a time investment and it’s just not practical to expect a pilot to remain sane AND have the entire region bookmarked to that degree. This poses the question, “How can you use bombers efficiently in non-bookmarked space?”. | ||
| Line 149: | Line 148: | ||
[[Image:clawupclose.jpg]] | [[Image:clawupclose.jpg]] | ||
| − | + | ==The Setup== | |
As soon as you know you will be using this tactic ''all'' pilots reset their default warp to distances to 7km, this will get them ready for the warp ins and allow them to get into position quickly once on grid while still maintaining safety for the Anchor. | As soon as you know you will be using this tactic ''all'' pilots reset their default warp to distances to 7km, this will get them ready for the warp ins and allow them to get into position quickly once on grid while still maintaining safety for the Anchor. | ||
| Line 173: | Line 172: | ||
| − | + | ==The Bombing Run== | |
When ready, the FC will start calling for certain squads to decloak and bomb in succession, in most cases those with EM and Thermal first, then Explosive and Kenetic. We want to drop bombs that affect shields first on the more popular ship types and then work our way into the armor. Keep in mind as FC in this situation you want to time the bombs far enough in between to avoid putting one set into another sets explosion radius but close enough to reduce the time the opponent has time to react and try to get out. | When ready, the FC will start calling for certain squads to decloak and bomb in succession, in most cases those with EM and Thermal first, then Explosive and Kenetic. We want to drop bombs that affect shields first on the more popular ship types and then work our way into the armor. Keep in mind as FC in this situation you want to time the bombs far enough in between to avoid putting one set into another sets explosion radius but close enough to reduce the time the opponent has time to react and try to get out. | ||
| − | + | ==Conclusion== | |
The Claw is a specialize technique that should be used in a roam situation when you may not have perfect warp ins and outs. Its versatile enough to be used anywhere but you do need time to execute it properly. | The Claw is a specialize technique that should be used in a roam situation when you may not have perfect warp ins and outs. Its versatile enough to be used anywhere but you do need time to execute it properly. | ||
| Line 192: | Line 191: | ||
| − | + | =The Danger Close(name under review)= | |
One of the more recent tactics coming out of Agony bomber squadrons marries the excellence of Agony skirmishing techniques and bomber ingenuity. This original premise tactic was actually thought up by one of our Trial members (at the time) Los Lecrosis. Several Agony pilots (Trial and Core alike) sanded down the edges into what we have today. First lets talk about the roles in this tactic. | One of the more recent tactics coming out of Agony bomber squadrons marries the excellence of Agony skirmishing techniques and bomber ingenuity. This original premise tactic was actually thought up by one of our Trial members (at the time) Los Lecrosis. Several Agony pilots (Trial and Core alike) sanded down the edges into what we have today. First lets talk about the roles in this tactic. | ||
| Line 200: | Line 199: | ||
| − | + | ==The Setup== | |
Setting up the Danger Close is relatively easy when compared to the above two tactics. Once you've decided to use this tactic make sure all bombers reset their "warp-to" distances back to 0km. Make sure that all your bombers are fully aligned towards the Anchor's position in space so that they can instantly enter warp when called. Because of the way warp dynamics work the location of each bomber in the system is of little consequence. The only negative to not having your squadron(s) all together at the same point to start will be the time to target factor, which will increase relative to distance to target. | Setting up the Danger Close is relatively easy when compared to the above two tactics. Once you've decided to use this tactic make sure all bombers reset their "warp-to" distances back to 0km. Make sure that all your bombers are fully aligned towards the Anchor's position in space so that they can instantly enter warp when called. Because of the way warp dynamics work the location of each bomber in the system is of little consequence. The only negative to not having your squadron(s) all together at the same point to start will be the time to target factor, which will increase relative to distance to target. | ||
| Line 229: | Line 228: | ||
At the end of the setup we should have all our bombers cloaked, in position ~30km from target at full STOP. The Fast mover should be adjusting his/her orbit to avoid de-cloaking his bombers or burning away from the target giving the bombers a TAM. If using a Slow Mover they should be on grid if possible at TAM distance to act as a potential exit point for his/her bombers. | At the end of the setup we should have all our bombers cloaked, in position ~30km from target at full STOP. The Fast mover should be adjusting his/her orbit to avoid de-cloaking his bombers or burning away from the target giving the bombers a TAM. If using a Slow Mover they should be on grid if possible at TAM distance to act as a potential exit point for his/her bombers. | ||
| − | + | ==The Bombing Run== | |
The bombing run for this tactic needs to be coordinated and executed quickly. Each pilot or squad should find an appropriate warp out point in the system. If the Fast or Slow Movers have established themselves at a TAM point be sure to publish it as a possible option to the squadrons. In the diagram below I've depicted an example run on target using our aforementioned squads (one explosive, one EM). It is recommended the fleet use multiple warp out points during the egress portion to create division within the enemy ranks as to where to go. Assuming all craft have modules that enable fast warp (Nanofiber Internal Structure) or warp Stabilization the chances of being caught, even on a slow align, are minimal. As shown remember you do not want more than 5-6 bombs on grid at the same time or you risk destroying your own bombs. When using this tactic, try to keep the squads small and nimble not more than 5 bombers. Stagger the release of bombs by squad for ease of understanding and | The bombing run for this tactic needs to be coordinated and executed quickly. Each pilot or squad should find an appropriate warp out point in the system. If the Fast or Slow Movers have established themselves at a TAM point be sure to publish it as a possible option to the squadrons. In the diagram below I've depicted an example run on target using our aforementioned squads (one explosive, one EM). It is recommended the fleet use multiple warp out points during the egress portion to create division within the enemy ranks as to where to go. Assuming all craft have modules that enable fast warp (Nanofiber Internal Structure) or warp Stabilization the chances of being caught, even on a slow align, are minimal. As shown remember you do not want more than 5-6 bombs on grid at the same time or you risk destroying your own bombs. When using this tactic, try to keep the squads small and nimble not more than 5 bombers. Stagger the release of bombs by squad for ease of understanding and | ||
[[Image:DCEgress.jpg]] | [[Image:DCEgress.jpg]] | ||
| − | + | ==Conclusion== | |
The Danger Close tactic has a distinct speed advantage on setup. It is versatile enough to be used on most single targets and some larger fleets depending on their stature (very spread out fleets may be difficult to establish a Fast Mover sufficiently around). | The Danger Close tactic has a distinct speed advantage on setup. It is versatile enough to be used on most single targets and some larger fleets depending on their stature (very spread out fleets may be difficult to establish a Fast Mover sufficiently around). | ||
| Line 248: | Line 247: | ||
*Increased communications discipline required. | *Increased communications discipline required. | ||
*Venerable to long range points while you align. | *Venerable to long range points while you align. | ||
| − | *Piloting skills and situational awareness a must especially for the fast movers. | + | *Piloting skills and situational awareness a must especially for the fast movers. |
| − | + | ||
| − | + | ||
Revision as of 19:04, 28 October 2010
| This article is currently under construction and the content is subject to change. Once the article has passed the peer review process please remove this template from the article body. |
Last Updated by: --Pappy Stirling 14:04, 28 October 2010 (CDT)
The Stealth Bomber Fleet
There are a myriad of individual tactics for bombers, this article focuses on some group tactics and the advantages and disadvantages of each, and it is by no means a comprehensive list.
Before executing any kind of squadron tactics – make sure that you (the commander) have assigned a common damage type for bombs for the squad(s) to allow for maximum damage output. Where possible use the strengths of your bombers. For example; you have 3 Hounds and 2 Manticores in your squad – you may want to consider going with Shrapnel bombs to accentuate the DPS bonuses the majority of your pilots (Hound pilots).
Bomber Fleet Reminders
Moving stealth bombers the right way through Eve space is challenging. As the commander of a bomber squadron it is your job to ensure the element of surprise is kept at all costs. Keep these rules in mind and you can mitigate the risk of blowing your cover.
- Before you start for the roam, assign default warp to distances for each pilot.
- KISS (Keep it simple stupid) use the fleet window to dictate who gets assigned what distance and use uniform multipliers. I generally use a distance of 7km per pilot.
- Remind the pilots that once the default is set the “Warp to (object)” option on the right click menu will use that warp to distance – warping to Zero on an object just got harder!
- Remind your pilots that warp to distances may change throughout the evening when new pilots join the ranks, leave ranks, and when tactics are adjusted - situational awareness!
- Where possible, you should be cloaked.
- Setup a default order on/in systems to re-establish cloak
- Review the MWD/AB + Cloak maneuver with the group.
- stay hidden as much as possible. Give the enemy Prober nothing and take from them everything.
- Explain the concept of self preservation
- Each pilot in a bomber squadron needs to recognize when the enemy is on an intercepting vector with their ship and should have the wherewithal to get out as necessary.
References in this Article
Slow Align – moving towards a target at a very low speed; generally 25-50m/s, designed to get your ship aligned to the target without closing distance too quickly.
Full Align - moving towards a target at 75%+ maximum velocity (which in a bomber is ~350m/s) designed to get your ship aligned and instantly in warp after the bombing run.
Anchor – This is the pilot calling in the bombers to a grid. The anchor and the FC are not necessarily exclusive.
Call-in - This is the script an anchor will use to bring his squad mates onto grid with him. The Call-ins differ depending on the tactic being used.
Fast Mover - An Interceptor with a 30km point and a speed of 5,000m/s+
We will now begin a review of three bomber squadron tactics developed by Agony pilots, take them, learn them, and adapt them to make them better – it’s what we do!
The Fly By
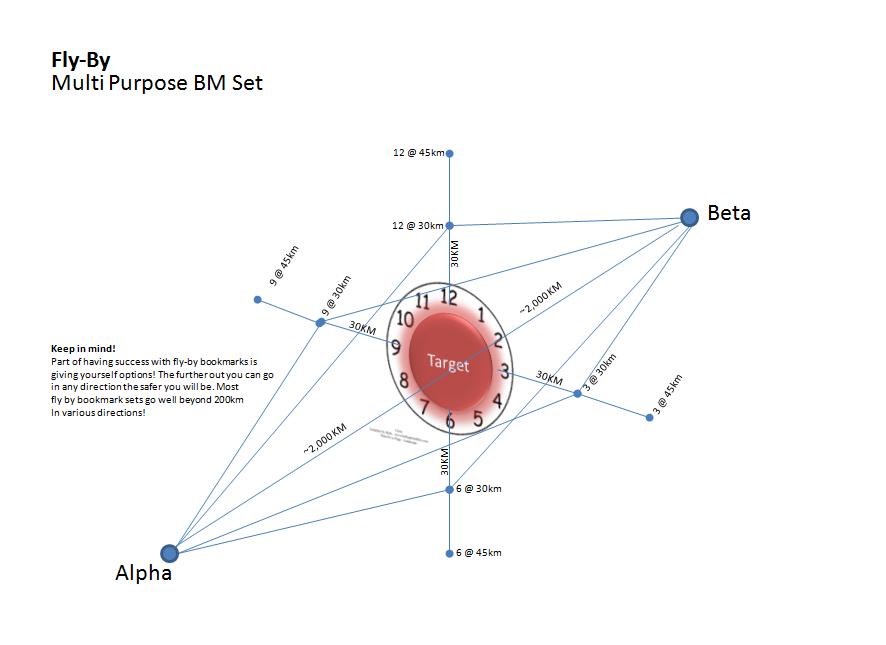
The Agony Fly-By tactic has a basis with a set of bookmarks off a celestial, in most cases a gate. The tactic includes one Alpha and one Beta point at opposite ends of the gate 4,000km+ from each other. Additionally, there are a series of BMs radiating off the celestial at various clock positions and distances. The clock is always read as if the pilot were at the alpha point. For more information on making fly-by bookmarks please read this comprehensive article.
A basic overview of the fly by maneuver elements is below.
Setting up the Fly By bookmarks takes approximately 30 minutes per celestial resulting in 35-45 possible bookmarks off the gate from at least four vectors. I recommend using a fast cheap ship (such as a Vigil) to create the Alpha and Beta points, and a SB or other Black-Ops ship to make the clock positions (traveling cloaked).
Once you have a set of fly-by bookmarks off a gate you can use a couple different tactics with your squadron of bombers with relative safety and efficiency. A note about fittings: when using Fly-By bookmarks for bombing runs you want your bombers to have a relatively short align time – modules like Nanofiber Internal Structure and Low Friction Nozzle Joints (rig) are great for this.
Alpha to Beta Exit
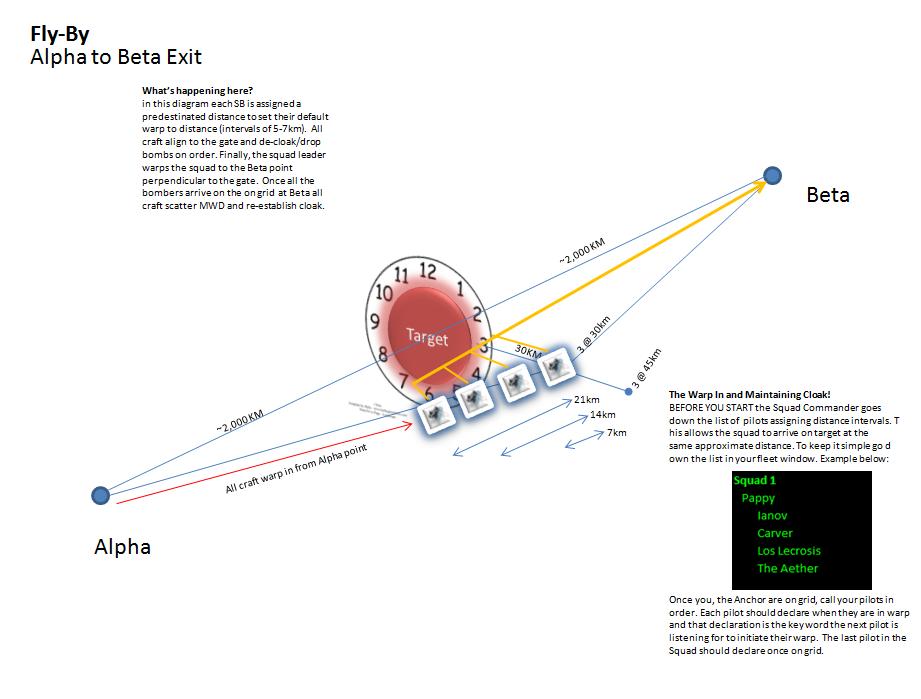
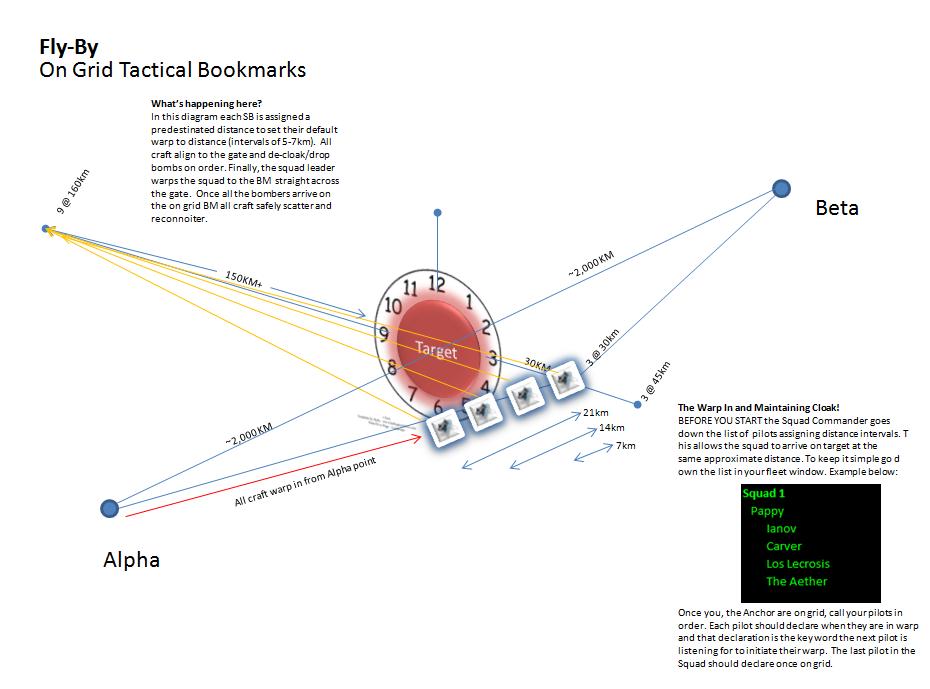
The first tactic we will discuss is the standard fly by bombing run. I’ve removed some of the unnecessary diagram details to show the bare-bones of the tactic. Let run through it step by step….
The Setup
In the setup the FC needs to have set the warp to distances for each of his bombers. Per the note above keep it simple – black ops on its face are complicated enough. The FC will need to get his gang to the Alpha point (or Beta point) – this is a great place to test your designated distances and make sure everyone is set. If you (the FC) warp to the Alpha and have your crew warp to you at distance, anyone not following instructions will get de-cloaked very quickly – identifying a rather embarrassing mistake early you can correct.
Once all the bombers are in position the on grid setup can be executed. As the owner of the fly-by tactic you will act as the Anchor for the setup. When ready warp yourself to the gate at one of your on grid tactical – in this case we are going to use the 3 o’clock position at 30km from gate. Once you arrive on grid you should assess the situation:
- Is this BM in danger of being busted by light orbiting craft?
- Is this a good angle of attack?
- Scroll out…is there a better location on grid we can use?
- If so, move back to alpha and head over to it!
Do not talk yourself out of every situation, but keep in mind it will take some time to setup so make sure you are giving yourself the best available chance to execute. Remember once you drop bombs the gig is up – you rarely get a second shot.Once you arrived at a suitable location start calling in your crew. Again you are going to keep it simple and just go down the list in your fleet window, which should match up to the distance assignments.
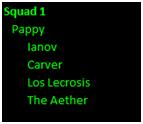
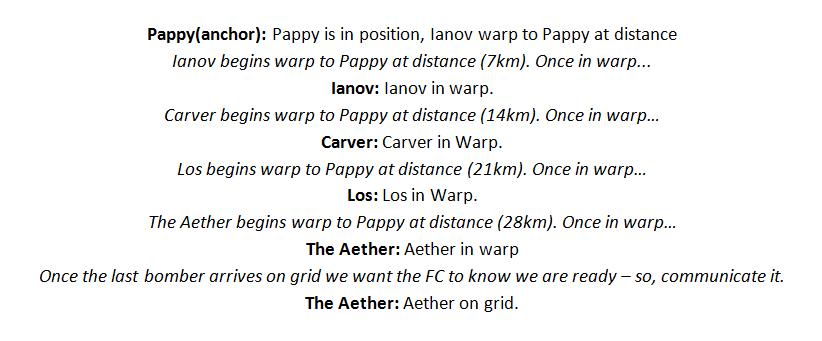
Above is my fleet window (or a crude approximation) and before I started my roam I assigned Ianov 7km, Carver 14km, Los 21km, and The Aether 28km. As the anchor, I’m going to call in the first pilot and the rest should fall in like dominoes. Each pilot should follow the preceding pilot into warp once that pilot calls that they are in warp. We do this to avoid passing through each other and risking de-cloaking.
In our example the dialogue should go something like this, please notice the use of the third person…
At the end of this exchange we now have all of our bombers on grid with the gate, still cloaked, and approximately 30km from target - setup complete.
The Bombing Run
The stage is set: the bombers are within optimal range and no one knows you are there. Again, for this tactic we will be using the Beta point from our Fly by bookmarks as our exit point, perpendicular to the target. Before you pull the trigger communicate to your squad if they will be warping themselves off grid or if you will be taking care of a squad warp. More commonly will be you warping the squad as a whole.
Once your target(s) of choice arrive on gate, Slow Align your squad towards the target (most likely the gate or something being attacked near the gate). As the commander you will be calling the order to de-cloak and to drop bombs, check your overview for the appropriate number of bombs, and immediately warp the squad off to the Beta point – BOOM!
Not over yet! Before the squad arrives on grid at the Beta point remind the pilots once you arrive on grid to burn off in a random direction and reestablish cloak. This will mitigate getting discovered by an unfriendly Prober and give you some time to assess the situation, check for losses/kill-mails etc.
Once your bomber module time has reset (120 seconds) you can rinse and repeat from a different angle!
On Grid Tactical Exits
The second tactic using fly-by bookmarks uses an identical setup procedure to the above tactic, however instead of exiting perpendicular to the target and landing OFF-grid, you will be exiting through the target and landing ON-grid.
The Setup
Again, the setup is identical to the tactic above please reference the above pages.
The Bombing Run
This round we will be using one of our fly-by bookmarks directly across gate exit point, parallel to the target. Your selected exit bookmark should be directly across the gate from your current location and at a sufficient distance to you to allow warping (150km minimum, but I use ~170km as a rule to compensate for drift). So in our example above our squadron is at the 3 o’clock position 30km from the target, as the FC I want to pick a fly-by exit point directly across gate (the 9 o’clock position) and at sufficient distance. Warping us to 9 o’clock @ 120km might work, however any bombers closer than 30km from the gate is likely to be left behind (< 150km from destination). Give yourself some room ~ 10-20km at least and more if you can. So, in our example I would warp the squad to at least 9 o’clock @ 140km to ensure I get all my birds out of danger, making the total distance to exit ~170km.
Reminder - before you pull the trigger communicate to your squad if they will be warping themselves off grid or if you will be taking care of a squad warp. More commonly will be you warping the squad as a whole as you have most of the bookmarks. Once your target(s) of choice arrive on gate, Slow Align your squad towards the target (most likely the gate or something being attacked near the gate). As the FC you will be calling the order to de-cloak and to drop bombs. Because you are now going straight across gate, you have the option of using a Full Align or a Slow Align depending on the situation and your distance to target. when you are ready, call for the gang to de-cloak and drop bombs. Check your overview for the appropriate number of bombs- and immediately warp the squad off to the Fly-by bookmark point.
Now because you are still on grid we still have work to do, before the squad arrives on at the on-grid tac you will need to be thinking off an off grid exit point (usually an Alpha/Beta) . Once the squad lands on the on-grid tactical you can warp everyone off to the off grid bookmark. Remind the pilots once you exit warp to burn off in a random direction and reestablish cloak to mitigate discovery. Once your bomb timer has reset (120 seconds) you can rinse and repeat from a different angle, 12:00 to 6:00, 9:00 to 3:00, 2:00 to 8:00, 10:00 to 5:00, the list goes on and on.
Conclusion
The fly by tactics is geared towards gate camp busting. It is versatile enough that a competent commander could place multiple squads at various points around the clock (12, 3, 6, 9, etc) and take down very large fleets given the right situation, however fleets nowadays are unlikely to stay on one gate for very long. Look for opportune moments when your opponent is most vulnerable; for instance when a large fleet enters your system/gate you are setup on and start a hard burn (MWD on) back to gate – bombing then maximizes your DPS.
Advanced Tactics:Fishing with Fly-Bys: It can also be used to fish your opponent(s) off gate by placing a bait target at the 45km bookmark and the bombers at the 80km bookmark (or any distances 30-40 km apart but in-line) on any one clock position. When the target(s) begin burning up to the target a set of well timed bombs is sure to give them a bad day.
Some advantages of this tactic:
- Highly adjustable to the situation – multiple angles possible.
- Great for getting around bubbled gates.
- Fast Setup Time
- Utilizing a comprehensive set of BMs that should already be part of an Agony pilot’s arsenal.
Some disadvantages of this tactic
- Slow initial setup time to create fly-by bookmarks
- When using the Beta exit the perpendicular exit point leaves you venerable to long range points while you align.
The Claw
So having fly-by bookmarks is great, however they do require a time investment and it’s just not practical to expect a pilot to remain sane AND have the entire region bookmarked to that degree. This poses the question, “How can you use bombers efficiently in non-bookmarked space?”.
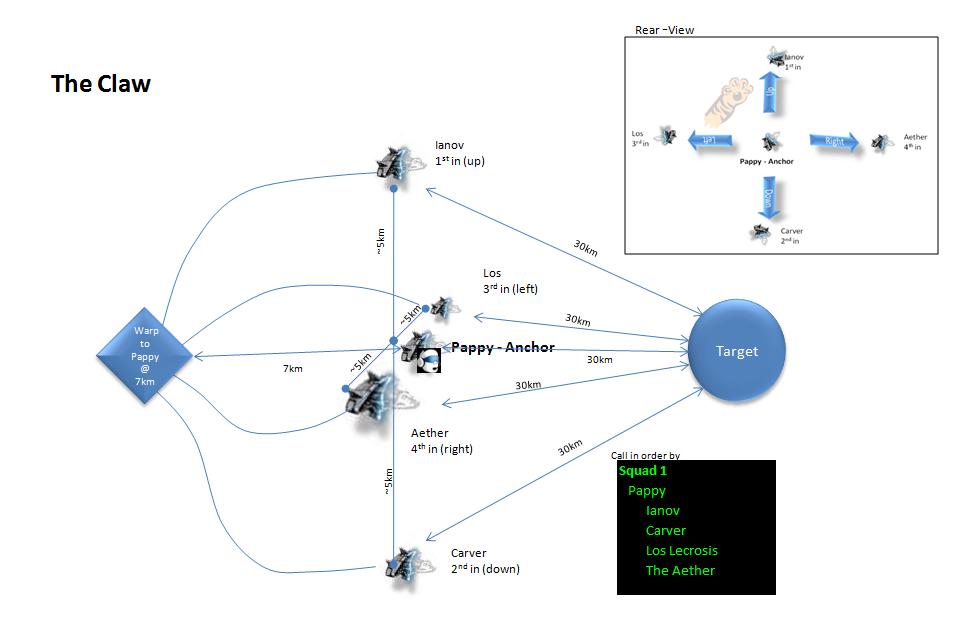
The Claw is designed to get multiple squads (or a Fleet off bombers) onto a target in an orderly fashion from various vectors when you do not have a Fast Mover or the targets shape are not conducive to a tight orbit as used in Danger Close. By replacing preset bookmarks with manual flying techniques - it trades setup time for safety and firepower but is highly reliant on manual flying and communication. Out of the three tactics shared in this article it is by far one of the slower to execute due to the number of moving parts.
The Setup
As soon as you know you will be using this tactic all pilots reset their default warp to distances to 7km, this will get them ready for the warp ins and allow them to get into position quickly once on grid while still maintaining safety for the Anchor.
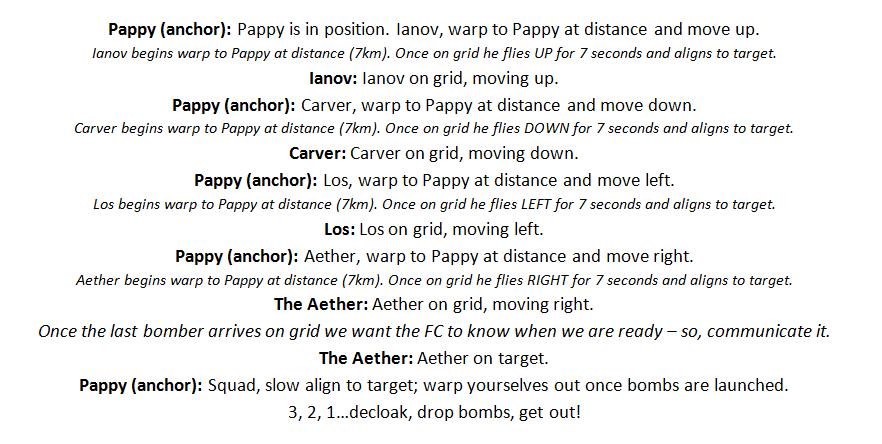
A quick note about the Anchor position. The Anchor is the linchpin in this tactic, the Anchor does not have to be the FC, nor the SC (although it helps). He is the primary communicator, the primary alignment caller, and the ship all others will be using as a point of reference during setup. When calling in the squad he/she will use a standard call-in script of UP, DOWN, LEFT, RIGHT. To keep things as simple as possible we are going to fall back on our fleet listing rule one more time and assign directions to the squad members based on their location in the fleet listing. Notice in the diagram above my fantastic approximation of a fleet window, as the anchor I'm going to use this as my call in list. So, as the Anchor once I find a target my script should something sound like this...
If you compare this call-in script to the last one you should notice the increased chatter back and forth. The increased communication is essential when setting up a singular Claw formation to indicate to the Anchor when to call in the next pilot and when he "can" start to execute the bombing run. At the end of the call-in all craft should be at ~30km from target, aligned to target, but far enough away from each other as to not decloak the other squad mates. All craft should maintain a full STOP once in position and await further direction from the FC/Anchor. It is also important that once the Anchor begins to call his mates onto grid, that he/she remains unmoving, moving up, down, left, or right can compromise your squad mates positions as well as your own.
Scalability
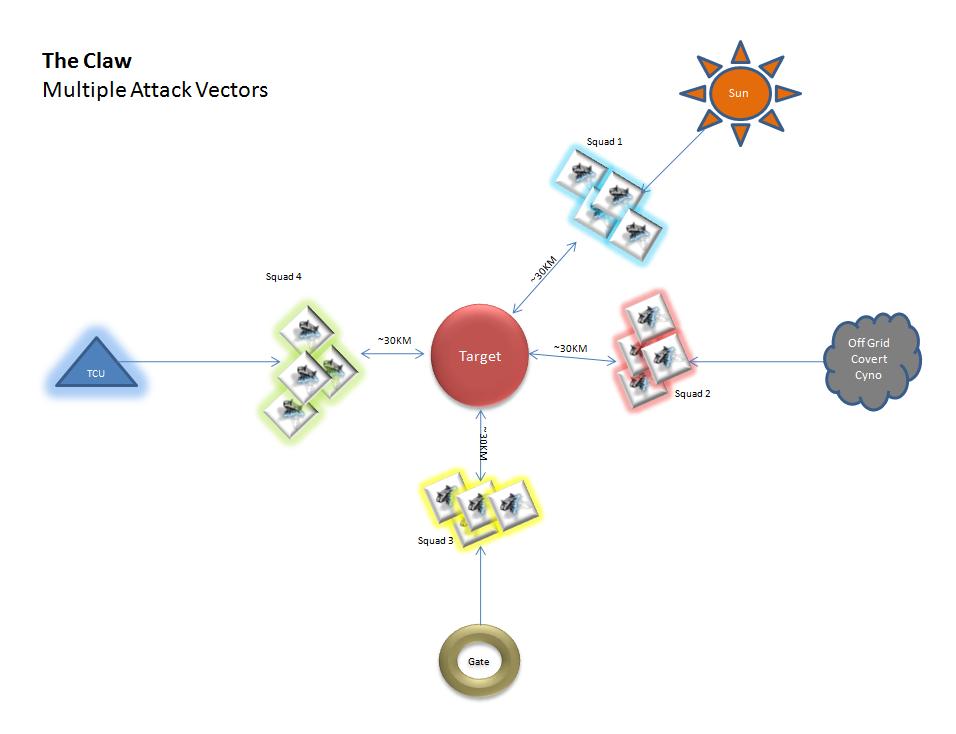
As FC, you can use the Claw tactic to send multiple bomber squads to any number of unique Celestials around the target and have them come in from those vectors safely as seen in the below diagram. Practically these origins could be a gate, a jump bridge, a station, a bookmark, a black ops cyno field, the list goes on. Keep in mind, each individual Claw will have its own Anchor, or person calling in the other bombers to grid. When setting up a multiple squad bombing run, the FC will assign his Anchors to arrive on location from various points in space, preferably from vectors far enough apart to defer overcrowding. This gives the individual Claws the best chance of having enough room to maneuver as well as presents confusing target vectors for any fast tacklers with the enemy gang. When running a large fleet of bombers try to keep everyone in the same type of bomber with the most beneficial ammunition in separate squads to accentuate the total DPS possible.
- Hounds with Shrapnel Bombs
- Manticores with Concussion Bombs
- Nemesis with Scorch bombs
- Purifiers with Electron bombs
In our diagram below you will see we have a target with 4 squads of bombers surrounding it in preparation of a bombing run. Each squad is color coded indicating a different type of ship and bomb type. Notice we have compartmentalized like with like to get max DPS. All four squads could have arrived in system from different origins, Jump bridges, gates, cyno fields, stations, etc. The FC has identified the target and assigned origin points for each of his squads, now he is going to leave it to the anchors in each of the squads to get their Claws in position. As the squads are ready the Anchors should report to the FC as such.
The Bombing Run
When ready, the FC will start calling for certain squads to decloak and bomb in succession, in most cases those with EM and Thermal first, then Explosive and Kenetic. We want to drop bombs that affect shields first on the more popular ship types and then work our way into the armor. Keep in mind as FC in this situation you want to time the bombs far enough in between to avoid putting one set into another sets explosion radius but close enough to reduce the time the opponent has time to react and try to get out.
Conclusion
The Claw is a specialize technique that should be used in a roam situation when you may not have perfect warp ins and outs. Its versatile enough to be used anywhere but you do need time to execute it properly.
Some advantages of this tactic:
- Roam Capable
- Highly adjustable to the situation – multiple angles possible, limited only by the number of warp vectors.
- Scalable to massive bomber fleets.
Some disadvantages of this tactic
- Slower setup time
- Increased communications discipline required.
- Venerable to long range points while you align.
- Piloting skills and situational awareness a must.
The Danger Close(name under review)
One of the more recent tactics coming out of Agony bomber squadrons marries the excellence of Agony skirmishing techniques and bomber ingenuity. This original premise tactic was actually thought up by one of our Trial members (at the time) Los Lecrosis. Several Agony pilots (Trial and Core alike) sanded down the edges into what we have today. First lets talk about the roles in this tactic.
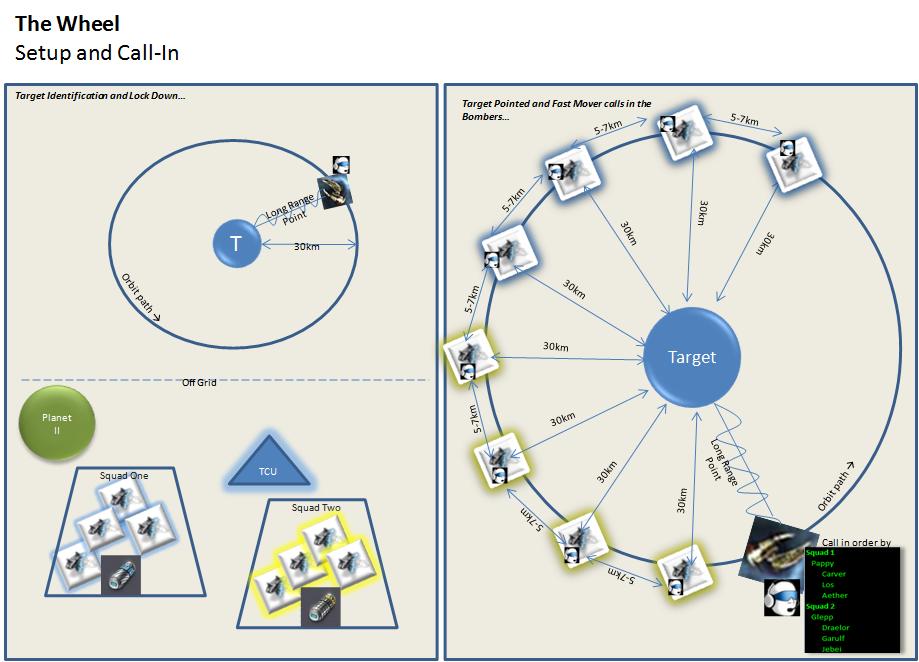
'The Fast Mover:' The Fast Mover is an interceptor, fit for high speed orbit at just under 30km. Key fittings include a MWD, a long range point (Warp Disruptor II or better), and a speed capability of over 5,000m/s. In this particular tactic the Fast Mover acts as the anchor, using a call-in to bring the various bombers on grid with the target.
'The Slow Mover:' The Slow Mover is a Covert Ops Prober, fit for highest speed possible orbit at just under 30km. The Slow Mover can also act as the anchor, using a call-in to bring the various bombers on grid with the target with a longer delay in between names.
The Setup
Setting up the Danger Close is relatively easy when compared to the above two tactics. Once you've decided to use this tactic make sure all bombers reset their "warp-to" distances back to 0km. Make sure that all your bombers are fully aligned towards the Anchor's position in space so that they can instantly enter warp when called. Because of the way warp dynamics work the location of each bomber in the system is of little consequence. The only negative to not having your squadron(s) all together at the same point to start will be the time to target factor, which will increase relative to distance to target.
In our diagram below we are depicting two parts of the setup. First, we have two squads of bombers located at different points in the same system, one at Planet II and the other at the TCU. In this example I've attempted to illustrate that the two squads are carrying different bomb types, one Electron(EM) and one Shrapnel(Explosive). We also have a target at an undisclosed location being tackled by a Fast Mover, traveling at 5km/s and pointing the target at just under 30km. We are using eight bombers in this example, however because of the circumference of the orbit we could have 20-25 bombers using the same technique on the same orbital plane!
When the FC calls for it, the Anchor will begin his call-in script of all eight bombers to grid. Since they are traveling at such a high rate of speed we want to call in each bomber one right after the other (remember 5,000 m/s?) putting each bomber 5-7km away from each other but still within premium bombing range.
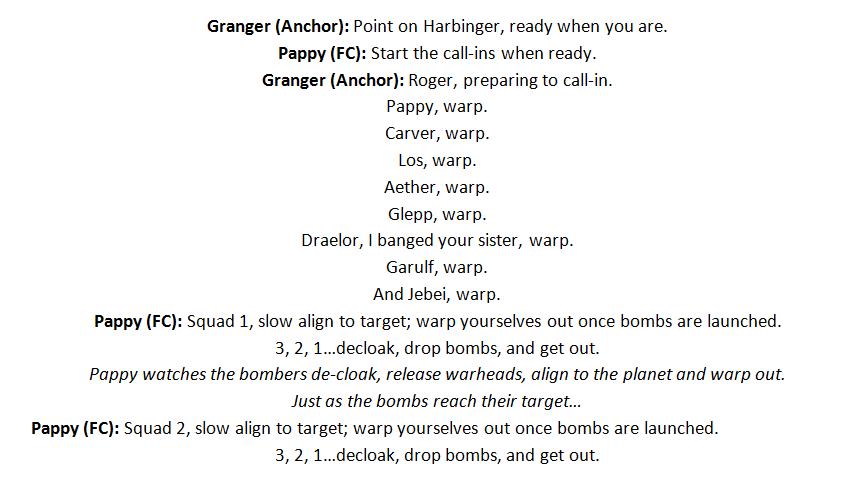
In our example, Granger will play the part of the Fast Mover, the call-in script should sound something like this..
Considerations for the Fast Mover In this tactic the linchpin is the Fast Mover. Keep a couple things in mind before you start calling in your squad mates.
- You're orbiting within an elliptical- try to avoid calling the bombers on the more concise sections of your orbit.
- The same phenomena of pilots arriving at the same location we see in basic class while making bookmarks can affect your pilots because of the way the server groups requests. Keep at least 1 second pauses in between names during the call-in to mitigate this problem.
- Moving targets will spiral the bombers around the target, so lead the target to compensate for this movement
- It may be required to act as the warp out (TAM), be ready if the FC calls for you to burn out and away at full speed.
- Once the last pilot is in, adjust your orbit to avoid de-cloaking the bombers on your second pass around.
Considerations for the Slow Mover Using a covert ops prober is certainly a viable alternative to a Fast mover, especially when you do not want to tip your hand or give the enemy a target they can beat. Keep a couple things in mind before you start calling in your squad mates.
- You're orbiting within an elliptical- try to avoid calling the bombers on the more concise sections of your orbit.
- You need to give as much space as possible during you're call in, during testing we found that an 8 second interval between names worked well with a slow moving prober.
- Its not your job to tackle targets, its your job to find targets, and call the bombers in - so stay cloaked.
At the end of the setup we should have all our bombers cloaked, in position ~30km from target at full STOP. The Fast mover should be adjusting his/her orbit to avoid de-cloaking his bombers or burning away from the target giving the bombers a TAM. If using a Slow Mover they should be on grid if possible at TAM distance to act as a potential exit point for his/her bombers.
The Bombing Run
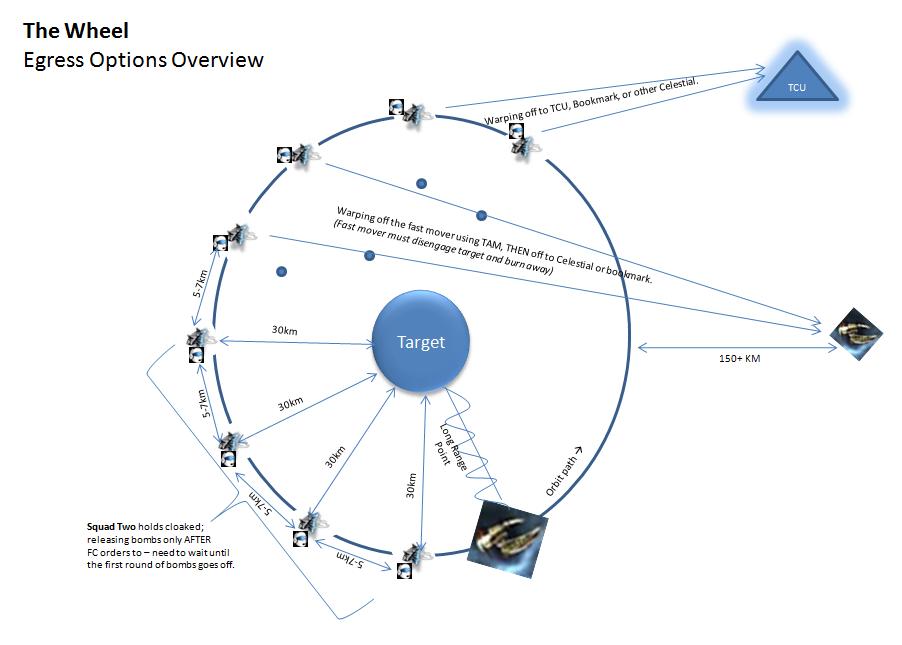
The bombing run for this tactic needs to be coordinated and executed quickly. Each pilot or squad should find an appropriate warp out point in the system. If the Fast or Slow Movers have established themselves at a TAM point be sure to publish it as a possible option to the squadrons. In the diagram below I've depicted an example run on target using our aforementioned squads (one explosive, one EM). It is recommended the fleet use multiple warp out points during the egress portion to create division within the enemy ranks as to where to go. Assuming all craft have modules that enable fast warp (Nanofiber Internal Structure) or warp Stabilization the chances of being caught, even on a slow align, are minimal. As shown remember you do not want more than 5-6 bombs on grid at the same time or you risk destroying your own bombs. When using this tactic, try to keep the squads small and nimble not more than 5 bombers. Stagger the release of bombs by squad for ease of understanding and
Conclusion
The Danger Close tactic has a distinct speed advantage on setup. It is versatile enough to be used on most single targets and some larger fleets depending on their stature (very spread out fleets may be difficult to establish a Fast Mover sufficiently around).
Some advantages of this tactic:
- Roam Capable
- Adaptable
- Low Inertia - high mobility
- Scalable to multiple squads fleets (up to 20-25 ships)
Some disadvantages of this tactic
- difficulty with fast moving targets.
- Increased communications discipline required.
- Venerable to long range points while you align.
- Piloting skills and situational awareness a must especially for the fast movers.
