Skirmishing
Scanning & Skirmishing Scout 101 By Killa Bee ©2007 Edited by Admiral Phobos / Secluse / Ash Vincetti
Contents
Introduction
This document covers the basics of scanning, and will guide you into becoming an effective Skirmishing Scout.
The Scouts main objectives are:
- to scan a few systems ahead of the main gang and help keep the gang out of harms way
- to find targets
A skirmishing scout acts as the Fleet Commander's extra set of eyes in the next system in addition to catching targets for the gang. Such scout should be proficient with use of the ship scanner and able to find and warp to the target within 30 to 45 seconds of entering the system. The only way to reach this level, is to practice, practice, and practice some more until skirmishing and scouting become second nature to you. Taking on scouting duty for the gang as often as you can is the only way of becoming a fast and effective scout and skirmisher.
A skirmishing scout thinks on his own and anticipates FC's orders (this is something that will come to you when flying regularly with a particular FC). He or she does not wait for the FC's commands before making the next move, jumping into next system, scanning out a possible target, or tackling targets when opportunity arises. However, it also has to be kept in mind that FC has the final say on movements and actions of gang's scouts.
The important of skirmishing scout is often underestimated. A gang with an outstanding FC and XO is merely a patrolling gang if they have a scout that isn't able to scan out a target and lock it down.
Scanning
Overview
Refer to the overview document: Overview Setup, if you require some knowledge of setting your overview. For the purposes of scouting, the key is to be able to get into a system and effectively scout through the system for a target as quickly and as efficiently as possible. Having the right overview is critical to avoid cluttering the information. Each scout will have their preferences, however a good start for a comprehensive "scouting" overview tab is to include:
- All ships
- Planets
- Asteroid Belts
- Towers (for POS)
- Stations
- Stargates
- Wrecks
- Mobile Warp Disruptors
Basics of the Ship Scanner
The scanner can be accessed through Ctrl+F11. A quick summary of using the scanner:
- Use the "Directional Scan" tab
- Use range as required (input 999999999999+ to set to max, which is a little over 14AU)
- Use the Angle to determine where the ship is scanning
- The "Use Active Overview Settings" checkbox, if set, will filter the results by your overview settings above. If unchecked, it will return all objects
- The Directional Scanner's angle is based on your camera facing, centered on the exact middle of your screen (on your ship). To best take advantage of this, you're going to want to zoom out a bit and click on your ship which will provide a white box, that is *usually* the exact center of scan, there are a few bugged models.
Basics of Scanning
Upon entering a system take a peek at local. If local is empty or friendly, there is not much point in scanning ships down. If you see some neuts and you are scouting, peek at the grid, and then at your overview, and assess how best to tackle scanning the system. Remember, scouting is often about speed, so it's about scanning as much of the system as possible within a reasonable amount of time.
Step 1: Situation Assessment
Take a look at your overview, and if required F11, to get a quick overview of the system. For example, I am scouting in Hemin and have just jumped through the Jorund gate, there are several neuts in local. Grid is empty (not camps). A quick peek of my overview shows the following:
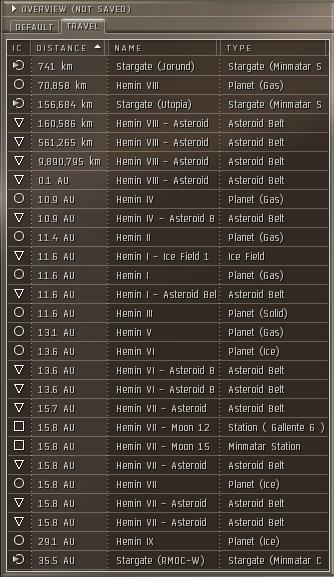

- This tells me that a scan will provide feedback up to and including Planet VI.
- Planet VII and beyond is beyond 14AU, the maximum of my ship scanner
- This leaves a few Asteriod Belts not included, and the RMOC gate. I would need to warp to a nearby planet if I wanted to scout this out
- Hit 'Scan'
Step 2: Initial Scan
After hitting the scan button, my directional scanner comes back with the following:
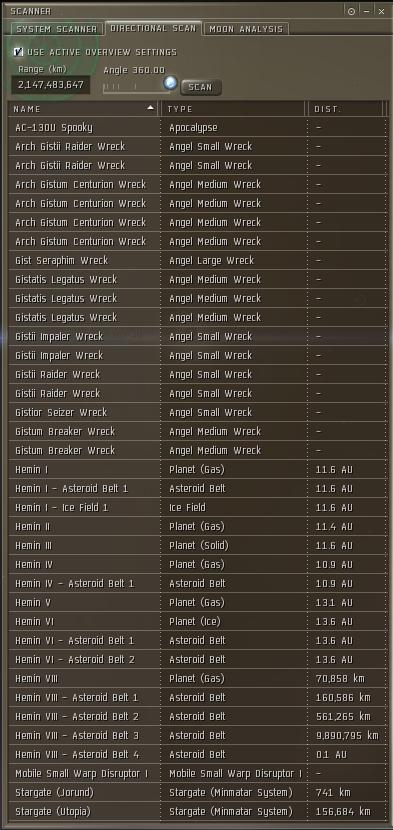

- Immediately I see an Apoc on scan, with wrecks.
- However, the wrecks on scan are not rats (Sansha rats in Curse), they are mission rats, so it appears it's a missioner and without a probe, not much I can do
Step 3: Next Steps
Scanning down a ship boils down to one simple concept, you are attempting to get the ship contact returned with only one other celestial. If you are successful, the ship is more than likely at the celestial returned, however there is always a chance he's in open space (which can improved by have very specific filters, however this is slower). There are three ways of filtering down the results:
- Setting range (not my preference)
- Setting angle
- Changing your overview settings (to filter out wrecks)
My recommendation is to change the angle. There are some important things to understand about using the angle:
- A 360 degree scan scans as a bubble around your ship
- All other scans scan as a cone. Since EVE is 3D, if you are on a 60 degree scan, you need to be aware of the vertical plane. Most EVE systems are on a flat plane, however there are a few exceptions to the rule, usually stargates.
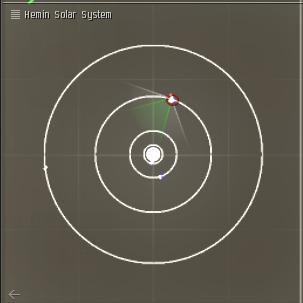
Now, the angle of the scan is based upon which way your camera is facing, not where your ship is facing. If you use F11, you can see how your screens FOV and the Ship Scanner correlates:
- The ship scanner angle has been set to 90 degrees
- The white cone on the F11 panel shows my screen POV
- The green cone on the F11 panel shows what my scanner POV
- If I were to rescan with a reduced angle, the results would only include those objects within my cone

Step 4: Wrapping up
Think of scanning as cutting up a pizza. On the pizza is a single anchovy, and we are at the exact center of the pizza. The initial 360 scan shows that we have a hit on the anchovy. My next step is to usually immediately drop to a 90 degree scan and perform 4 scans (1 north, 1 west, 1 south, 1 east), i.e. I have divided the pizza into 4 slices. If the anchovy shows on the southern slice, I reassess what other celestials are returned.
If there is only a single celestial on scan, I have probably found my target. If it returns a single planet and 10 asteriods, I will warp to the planet so I can better scan the asteriods. It's a simple process of elimination, and every pilot has their own preferences. The key is to be as quick as possible, and it comes best with practice.
Main thing is keep it simple and efficient, start scanning at a higher number of degrees and when you gain experience you will notice that you go down fast, i usually start off at 360, then 90, 30 or 15 and end up at 5 or sometime not even bother with 5 degrees. It all depends on the system layout and the space in between Belts etc etc.
Practice practice and practice some more.
Summary of Key Scanning Keys:
- F11: This will open the System Overview, focus only on the bottom most box the System Display
- CTRL+F11: Opens up the Ship Scanner
- ALT: Press and hold this key, it will give you a sort of Cross Hair square in the middle of your ship which represents the scanning centre of you ship (i.e. helps you establish where the center of scanning cone is). It will also show the Moons in space.
Skirmishing
Finding the target is only step 1, the next step is to get the tackle and to get your gang mates to you for the kill. Some key concepts to considering about each of these is:
Tackle
With the introduction of Quantum Rise there are a few new things to consider:
- Warp Scrams now deactivate MWD's
- Webs have been reduced to 50-60%, making a ship burning back to the gate difficult to hold with a single web
- Agility has been increased, making ships warp a lot quicker. Getting a lock and point on a target is key
These changes means that some planning and thought needs to be given to your fittings, and the decision will be impact based upon the purpose of the gang. Some thought considerations:
- Warp Disruptors are critical when trying to stop the target from escaping, e.g. sitting on a gate without a bubbler. If you fit a scram, you will not be able to close the gap to 10km to place the point before the target warps (unless he decloaks very close to you)
- Warp Scrams are critical to slow down fast targets, including those trying to burn back to a gate. However you lose a few precious seconds getting into range. I have seen many a skirmisher get popped because he could hold a point, but the rest of his gang was not fast enough to catch the target, even after using a TAM
- Webs compliment Scrams nicely, however if you can only have 1 module, deactivating the MWD is more effective than a web, unless your target has an AB. In 0.0, you are unlikely to see ships under cruiser without a MWD (however AB's are more common in AF's and Frigs)
- AB vs MWD. The biggest penalty about MWD is the sig radius bloom, however inty's now get a ship bonus to reduce the impact of the sig radius penalty. I could see a few viable uses for an AB inty, however this does significantly reduce the ability of the pilot to get points on targets.
To summarize: with QR interceptor pilots have some decisions to make, both in fitting and flying.
Communication
Communicate to your FC as clearly and concisely as possible. There are several threads about this, however spend an extra few seconds to consolidate that data you wish to communicate. If there are 50 ships, spamming vent with each and every ship type when you are in a 5 man frig gang is not necessary, a summarized "50 man HAC / battleship gang" is sufficient. The FC has a lot of intel to process, help him by being as succinct as possible.
Target Assessment
Someone is hopefully assigned with target calling duties, and this is more of an art than a science. However, scouts and skirmishers also have to perform a risk assessment to help feed the FC with key data. In summarizing your data, help your FC out by calling out key tactical targets that could be key to his decisions, for example:
- If there are HICs, Dictors or mobile warp disruptors on scan
- Key recons (Curses, Rapiers, Arazu's, Falcons, etc.)
- Other key strategic targets (high value or high risk, such as capitals, T2 battleships, etc.)
Local vs. Grid vs. Scan
There are 3 sources of Intel available to a skirmisher: the all-seeing eye of local, what he can eyeball on his own grid, and what his ship scanner can eyeball beyond his grid and up to ~14AU. Each source provides different intel:
- Local: Key data provided is an accurate number of potential pilots, as well as corporation and alliance. When entering a system give a short report of local and if there are multiple players check their Corp / Alliance name (<5 check all, >5 check a few randomly), right click their avatars in local and select 'Show Info'. If there are 10 in local, all from the same corp, it's more likely there is a 10 man active gang passing through than when it's a total mix of alliances. This is made more difficult due to NAP fests, however it's still useful intel
- Grid: Key data provided is ship types, and the knowledge of an immediate 'active' threat. After punching out the total in local, summarize what is on-grid and provide some feedback
- Scan: Key data provided is ship types, however without the knowledge if the ships are 'active' or stored at a POS. After punching out the grid situation, provide some feedback as to what is on scan
To summarize, you are trying to summarize the information as much as possible, while still calling out strategic targets to help the FC calculate the risk / reward statement. Every FC will be different so styles may vary, but from my perspective a scout is only as good as their ability to communicate what they see, and a skirmisher is only as good as their ability to tackle. Work on developing a communication style and you will only become a better skirmisher. Feeding poor intel can in many situations actually provide more harm to your FC and gang than no intel at all.
Intel Reports
2 points:
- Always start with: "Recon:" <pause> "your name in system on celestial". In other words: "Recon", wait a second for Vent chatter to clear, "Secluse in X-7 on the LT gate", proceed with report. This is where I see intel reports hurt FC's, when they believe you are in a different system, or on a different gate, and make the wrong decision and warp the gang into the very massively huge blob fleet you are trying to provide intel on.
- Try summarize the report clearly as outlined above, and then in the words of my mentor "try sound bored giving your report", it helps remove inflections in the voice to provide a clear report that can be understood.
TAMS
There is a great document outlining this concept: TACTICAL ASSISTED MINIWARP (TAM).
To summarize, small fast ships are fantastic in allowing the larger fleet to move around quickly through mini-warps (on-grid usually). TAMs can be used offensively (to get the DPS to the target) or defensively (to get the fleet safe) in a variety of situations.
Scout Scanning vs. Probe Scanning:
Pros
- Can be a lot faster then using scan probes, which has a fixed time based on the skills you have
- Players can't see that you are scanning them out, a scan probe can been seen and they usually either safe spot, bounce between spots or cloak
- Requires no in-game/EVE skills, everyone has a ship scanner and everyone can do it from day 1
- A Scout goes in to tackle the target himself, where as a Cov Ops provides the warp-in point for the tackler. This allows the target to see local increase and provides more time to get safe
Cons
- You can only find players that are at a warpable overview object (i.e. you scan down safespots, but you cannot warp to the contact)
- Less accurate, you can't warp in a 0 or 10km on the target itself, you can only warp to the celestial where your target could be many km's from the warp-in point
- You are visible on scan where a Cov Ops can warp around cloaked
Synergy with Cov-Ops
A skirmisher is not equal to a combat interceptor, each is a distinct and separate role (with elements of overlap).
Skirmisher: The primary point of a skirmisher and scout is to provide intel and get points on targets of opportunity, a role that is complimentary to Cov Ops. The Skirmishing Scouts, covops scouts, and rear/front guards are there to provide intel, and to catch ships before they get to the main fleet, as well as provide an intel buffer that lets the FC know what's going on in the adjacent systems. The skirmishing scouts, then, also have the responsibility for catching and holding targets of opportunities at belts / planets / etc. Their job is to pin the target down long enough to get the fleet there, and this responsibility is paramount, and primary to DPS or any other consideration. They should fit for speed, and tackle, making sure they can hold a point for the 3-7 minutes it will take for help to arrive on a worse-case scenario.
Combat Interceptor: The combat interceptors have their roles within the fleet. They can be tacklers for the main fleet, staying with the fleet. They can and will engage small targets of opportunity and light ships. They can and will drive off enemy interceptors.
Here is an example:
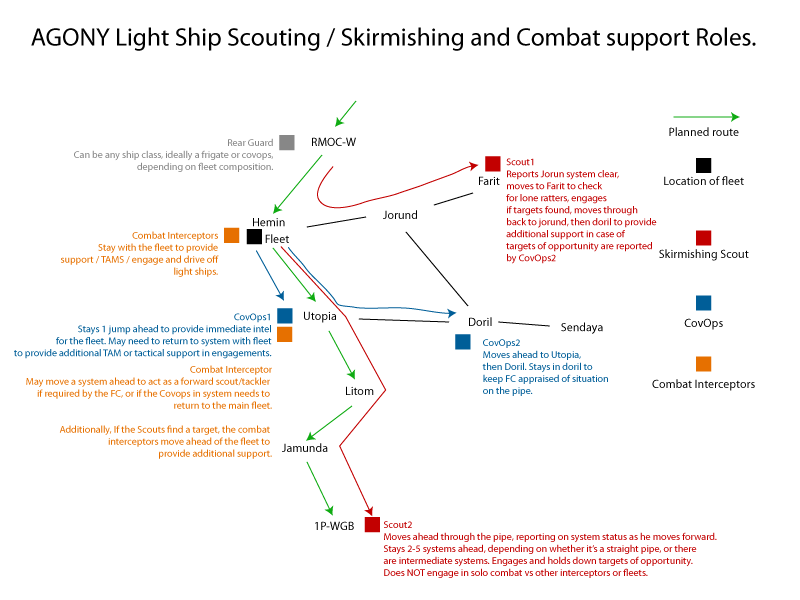

Examples
Report and movement
Reporting should be short but should also contain as much useful info as possible.
- "Scout moving into LTS, friendly out". Report to make the gang aware that intel on next system is coming = hold comm. chatter
- "Scout, LTS local is clear moving to XYZ gate". Obvious, the gang will move to the gate of that system and jump
- "Scout, XYZ has 2 in local" (while saying that open their 'Show Info'), "1 NPC and 1 Tri" (you scan 360) "nothing on scan".
- When there are more in local then just a few you change the order and priority of things and might say something like this:
"Scout, LTS has 7 in local" (you scan 360) "Vaga and Domi on scan, checking Corp / Alliance". Now you do a randomly check of a few players by looking at their 'Show Info' and report that again: "Scout, local has 6 Tri and 1 unknown"
When a system has multiple players in local your priority is getting the gang in and through that system safely, go to a tactical of the gate (or warp to a planet and power away) and keep scanning, report changes. When the gang jumps in you go to the next gate and keep scanning while you warp off, report changes. At the tactical (or Planet) of the next gate you report if it is clear or camped. Depending on what is on the gate (no bubble or Dictor) you go to and through the gate and report it by saying: "Scout moving into LTS, friendly out" Once you and the gang are out of all imminent danger and have moved a few systems you can get back to the finding targets.
Target
- "Scout, Raven on 5 degrees toward belt moving in". Yay you found target, this report is to get the gang ready for action and we now have battlecomms
- "Scout, point on target warp to Piwata Bee .... warp to Piwata Bee". Hopefully everyone would already have you on their watchlist. The FC has the final say on the 'warp' statement to engage. Your key role here it to keep that point until the gang arrives.
- Gang is informed you have a point on him and to whom they need to warp to, the FC orders the gang to jump and either warps the gang or let them warp on their own towards you. Once the gang has arrived, your role as a skirmisher / scout is complete. At this point if your gang has multiple points on the target, you should usually disengage and get into the next / previous system to provide intel if a gang is building, or to catch the target if it escapes to the gate. Your role is to scout and catch, not to pop targets, and intel is usually more valuable than the 60 DPS you'll be adding.
Other Examples
When entering a system where the clusters and gates are far away you warp towards a central Planet, in-flight you keep spamming the scan button and if a ship shows up while the clusters and gates are still out of scan range it usually means that this ship is warping towards the gate you just left. Report this immediately and make sure the gang gets ready to engage.
It could also be a gang is warping in which forms a threat for the gang so always report numbers and composition of ships in that gang.
When the Agony gang is in combat go back to the gate where the gang is and power a few hundred Km out but stay on grid and keep an eye on the scanner and gate to make sure there is nothing coming to ambush them. NEVER EVER jump back into the system the gang is fighting in (unless you are in a dead end system which is empty), the scout doesn't bring that not much more DPS and having eyes in another system can be crucial !
I have had large forces move to the gate and go through in an effort to help the guy that was under Agony attack. By reporting that and telling them to disengage and warp off everyone stayed out of harms way.
When jumping into a gate camp take your time to zoom out and report what ships there are, if there is a bubble report type and its size. Next look at the best way to power out of the bubble but if there are Battleships they might NOS* you before you are able to warp off or are out of their range, in that case powering back to the gate might be your best option.
Ask the FC for a new destination if you are 2 to 3 jumps out of your final destination, this gives the FC plenty of time to set a new one.
Happy hunting!