Difference between revisions of "User:GernBlanston"
GernBlanston (Talk | contribs) |
GernBlanston (Talk | contribs) |
||
| Line 75: | Line 75: | ||
==Introduction== | ==Introduction== | ||
| − | [[Image:zero.jpg|600px]] | + | [[Image:zero.jpg|600px]]<br> |
In the above diagram, we can see that the question of being "on gate" is actually quite complex. When you warp to a gate and land at or near 0 on your overview, you are at what I refer to as "zero on gate." But there is space between the gate model and this zero radius, so you can actually get closer. For example, you can power-approach gate until you bump into the model, at the gate model radius. Even then, you aren't at the center of the gate, and you can actually get even closer. For example, an intrepid frig can sometimes clamber through some gate models to sit at the absolute center, which I refer to as "true zero." Depending on the size of the gate, the distances between true zero, the gate model radius, and zero on gate can be many, many kilometers. The figure above is just an example of how the distances may look. | In the above diagram, we can see that the question of being "on gate" is actually quite complex. When you warp to a gate and land at or near 0 on your overview, you are at what I refer to as "zero on gate." But there is space between the gate model and this zero radius, so you can actually get closer. For example, you can power-approach gate until you bump into the model, at the gate model radius. Even then, you aren't at the center of the gate, and you can actually get even closer. For example, an intrepid frig can sometimes clamber through some gate models to sit at the absolute center, which I refer to as "true zero." Depending on the size of the gate, the distances between true zero, the gate model radius, and zero on gate can be many, many kilometers. The figure above is just an example of how the distances may look. | ||
| − | At this point most of you know where I'm going with this. When trying to catch stuff coming through a gate, it really matters where you position yourself in relation to the gate. I present three cases below. | + | At this point most of you know where I'm going with this. When trying to catch stuff coming through a gate, it really matters where you position yourself in relation to the gate. I present three cases below.<br> |
==Case 1: fleet coverage waiting on gates== | ==Case 1: fleet coverage waiting on gates== | ||
| Line 85: | Line 85: | ||
[[Image:spread.jpg|600px]]<br><br><br> | [[Image:spread.jpg|600px]]<br><br><br> | ||
| − | When your fleet lands on a gate, and there is any chance at all of a target jumping into system through that gate, spread yourselves around the gate, ideally at ~2500 m. DO NOT sit like unmotivated lumps at the spot you land and hope that anyone coming through will spawn close to you. Because he probably won't, and in the worst case, he will come in over 20km from you. This spreading-out behavior should be automatic, and kind of "brownian" in that it doesn't have to be perfect, but at least get better coverage than you initially had when landing. | + | When your fleet lands on a gate, and there is any chance at all of a target jumping into system through that gate, spread yourselves around the gate, ideally at ~2500 m. DO NOT sit like unmotivated lumps at the spot you land and hope that anyone coming through will spawn close to you. Because he probably won't, and in the worst case, he will come in over 20km from you. This spreading-out behavior should be automatic, and kind of "brownian" in that it doesn't have to be perfect, but at least get better coverage than you initially had when landing.<br> |
==Case 2: Interceptor behavior for tackling on gates== | ==Case 2: Interceptor behavior for tackling on gates== | ||
| Line 93: | Line 93: | ||
When you are the primary light tackle on grid (inty or other fast tackle frig) and have a long point, you should be sitting as close to true zero as possible without getting hung up on the gate model. You should NOT stay put where you land on gate, and DEFINITELY NOT orbit the gate at ANY distance. When the target drops gate cloak, you want to be reasonably equidistant from all of his possible positions. If you are orbiting gate, he will wait until you are at the far point of your orbit before decloaking. He now has two advantages in getting away: he has a better chance of being out of tackle range, and your momentum is carring you in the wrong direction to approach him quickly. This becomes even more critical when trying to decloak a target entering system. | When you are the primary light tackle on grid (inty or other fast tackle frig) and have a long point, you should be sitting as close to true zero as possible without getting hung up on the gate model. You should NOT stay put where you land on gate, and DEFINITELY NOT orbit the gate at ANY distance. When the target drops gate cloak, you want to be reasonably equidistant from all of his possible positions. If you are orbiting gate, he will wait until you are at the far point of your orbit before decloaking. He now has two advantages in getting away: he has a better chance of being out of tackle range, and your momentum is carring you in the wrong direction to approach him quickly. This becomes even more critical when trying to decloak a target entering system. | ||
| − | There is a caveat for case 2, which I alluded to by saying "without getting hung up on the gate model." In most cases it is actually not desirable to be too close to true zero, even if you aren't touching the gate model. The closer you are to the gate model, the more of your pursuit vectors are cut off by the model. It is actually a matter of judgement to find the best compromise between centering yourself and still being able to approach most targets. If you have two light tacklers available to cover the gate (assuming the other side of the gate is already covered), the best option is to position yourselves on opposite sides of the gate model, either top/bottom or side to side. At this point, however, we are starting to talk about Case 1 again. | + | There is a caveat for case 2, which I alluded to by saying "without getting hung up on the gate model." In most cases it is actually not desirable to be too close to true zero, even if you aren't touching the gate model. The closer you are to the gate model, the more of your pursuit vectors are cut off by the model. It is actually a matter of judgement to find the best compromise between centering yourself and still being able to approach most targets. If you have two light tacklers available to cover the gate (assuming the other side of the gate is already covered), the best option is to position yourselves on opposite sides of the gate model, either top/bottom or side to side. At this point, however, we are starting to talk about Case 1 again.<br> |
==Case 3: Dictor bubbling on gates== | ==Case 3: Dictor bubbling on gates== | ||
| Line 99: | Line 99: | ||
[[Image:dictor.jpg|600px]]<br><br><br> | [[Image:dictor.jpg|600px]]<br><br><br> | ||
| − | When you are the lone dictor in fleet whose primary purpose is to bubble targets jumping through a gate, you should be sitting as close to true zero as possible. And in many cases, cutting off your pursuit vectors isn't even a concern (e.g., you aren't expected to scram or shoot the target, or you plan to immediately jump through to the other side). DO NOT sit at the "zero on gate" radius, because based on my experience your odds of catching the target will be pretty bad. I can't count the number of times a dictor stays put where he lands on gate, bubbles up, and then the target decloaks outside of his bubble on the far side of the gate. A dictor's bubble radius is 20km, so bubbling up at true zero will catch all targets except on the largest gates. For situations where you have two dictors, as with the intys example above, you can put the dictors on opposite sides of the gate model for better coverage. | + | When you are the lone dictor in fleet whose primary purpose is to bubble targets jumping through a gate, you should be sitting as close to true zero as possible. And in many cases, cutting off your pursuit vectors isn't even a concern (e.g., you aren't expected to scram or shoot the target, or you plan to immediately jump through to the other side). DO NOT sit at the "zero on gate" radius, because based on my experience your odds of catching the target will be pretty bad. I can't count the number of times a dictor stays put where he lands on gate, bubbles up, and then the target decloaks outside of his bubble on the far side of the gate. A dictor's bubble radius is 20km, so bubbling up at true zero will catch all targets except on the largest gates. For situations where you have two dictors, as with the intys example above, you can put the dictors on opposite sides of the gate model for better coverage.<br> |
==Conclusion: be the spider== | ==Conclusion: be the spider== | ||
| Line 107: | Line 107: | ||
[[Image:spiderweb.jpg|600px]]<br><br><br> | [[Image:spiderweb.jpg|600px]]<br><br><br> | ||
| − | Of course there will be exceptions to all of the above, but in general | + | Of course there will be exceptions to all of the above, but in general this is the best way to grab stuff on gates. There are also behaviors I didn't describe but are still valid. For example, if your fleet is large enough (think PVP-U) then it may be good to have everybody orbit gate at 12km because of the sheer density of coverage you get with 50+ ships. <br> |
Revision as of 15:39, 4 April 2013
Original text by ROXGenghis.
Copyright Agony Unleashed
Syndicate Intel
Territory Map
Table of Residents
Intel Notes
Dotlan tadar tracking tool
Description
The dotlan radar tracking tool will track your movement through the Eve universe and display it on a map in either your in-game browser (IGB) or out-of-game browser (OOGB). Dotlan radar is an excellent tool whenever you are moving through systems, whether solo PVP'ing, as a member of a roaming gang, or just doing logistics.
For gangs, each gang member typically tracks his or her own movement to promote individual situational awareness. It is also possible to allow someone else to track your position. For example, the FC could track the position of scouts and skirmishers. Or vice-versa: scouts and skirmishers can monitor the location of the main fleet body.
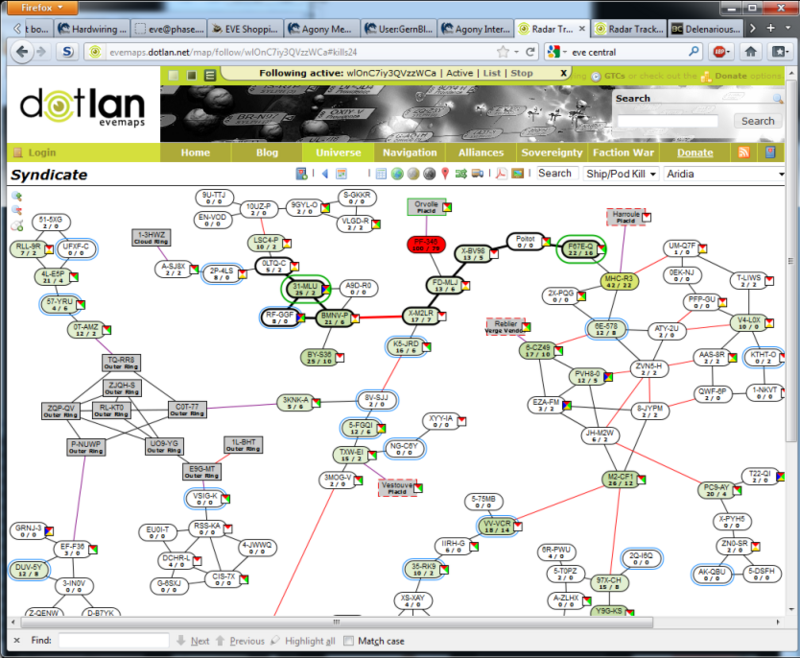
Here is a sample radar track:
Systems you have visited are highlighted with bold black outlines. The larger green ovals show your starting system and your current position. You can therefore determine at a glance where you are and where you've been. In the example screenshot, I started in 31-MLU, bopped around the neighboring three systems, then traveled down the pipe to F67E-Q.
Usage
The radar tool requires the IGB to track your location. Once enabled, you can use either the IGB or an OOGB to display the tracking map. Simplistically, you can think of the dotlan radar tracking feature as a client-server system, where the IGB is the server (it knows your location) and the client (which displays your location) can be either the IGB or an OOGB. In the latter case, the tool is most useful when you have a second screen or second computer on which to display your location track. In both cases, however, the IGB ("server") must remain open and pointed at the dotlan radar website to function.
More information than you require: To support OOGBs, a token is provided by the IGB for use by an OOGB to display your track. Tokens are 16-character alphanumeric strings that can be copy-and-pasted (as part of a URL) into your OOG browser or sent to another player. This means you can give your token to an FC or scout so they, too, can track your location. Since tokens can be re-issued at will with a quick click of a button, there is no danger of unwanted players tracking you by using old tokens. We will revisit tokens later in this article, but understanding them is not essential for basic use of the radar tool.
Set up instructions
Go to the radar site with your IGB and set your IGB to trust the site, per the following screenshot:
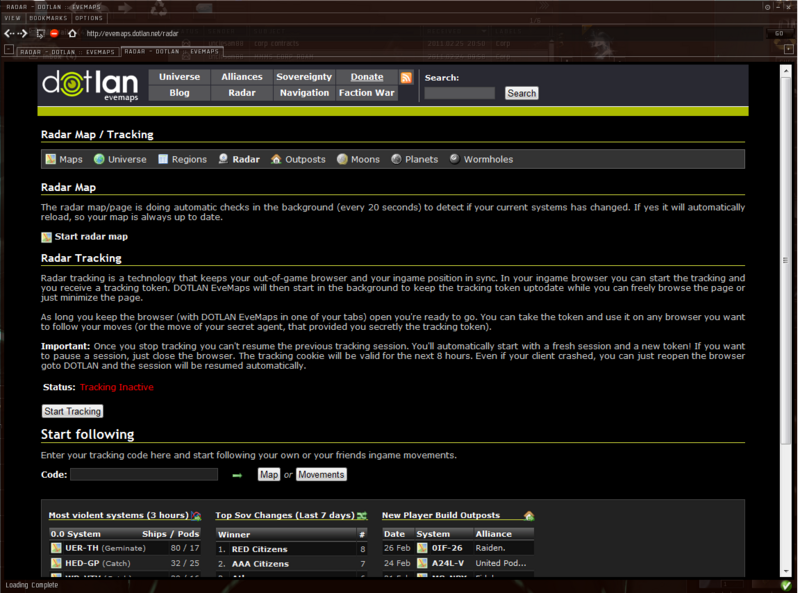
The radar tracking page should now be accessible (see the screenshot below). It will show "tracking inactive" in red text the middle of the page. To start a tracking session, click the "start tracking" button below the red text.
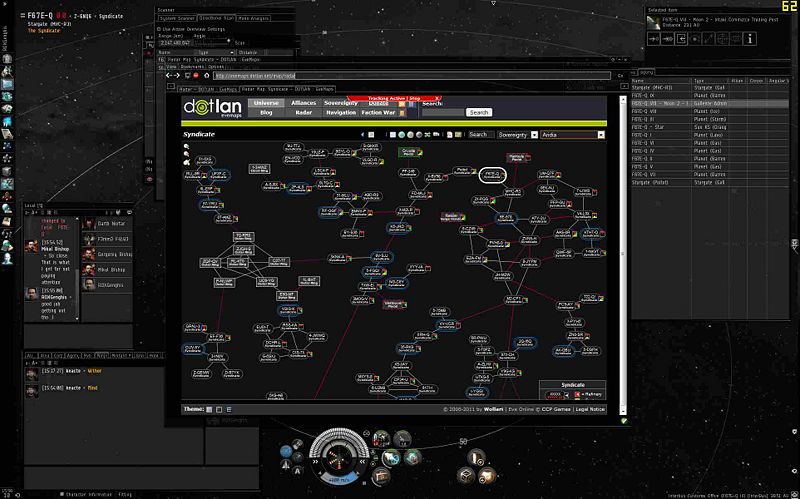
Tracking should now be active (see the screenshot below). There are two indicators that tracking is active. First, a wide red tab is displayed at the top of the page that says "Tracking Active." Second, the status shown in the middle of the page will change to green text saying "Tracking Active." Note also that the aforementioned token and URLs have been generated; we will discuss these shortly.
To display your radar track using the IGB, click on the "Start radar map" text located towards the top of the page (but below the banners). A radar track displayed in the IGB looks like this:
To display your radar track using an OOGB, copy-and-paste the upper of the two URLs into your OOGB. Specifically, use the URL with the word "map" embedded in it, rather than the URL with the word "radar" embedded in it. The first screenshot in this article is an example of a radar track displayed in an OOGB. The second URL (containing the word "radar") just shows an ordered list of systems you've visited and is not as useful as the map version.
Sometimes the tracking system stops working properly. The tracking map is supposed to automatically refresh your position every 20 seconds. If your position no longer refreshes on your radar track, stopping and re-starting tracking usually solves the problem.
Remember again that the IGB must remain open and pointed at the dotlan radar web page for the tracking system to function. This means that if you click on a link someone posts in chat, your browser will open the new link in the IGB's radar tab and you will lose your tracking. A good way to avoid this is to open a new (empty) IGB tab after you turn on the radar tracking. This way any new links you open in the IGB will use the new tab and leave your tracking web page intact.
Regarding tokens
For the tech-minded, we revisit tokens here. Note that the token is embedded in each URL. Without the tokens, all radar tracking URLs are identical. This comes in handy when you want to display your radar track on a different computer and you have to type it in manually because you can't copy-and-paste between hosts. In this situation, you can navigate to the radar web page and then just type in your token. This also means that giving another player the URL of your radar track is equivalent of giving out your token. Anyone with your token can see your position in-game. While you may want to give your token (or URL) to fleet mates, you may not want them to persist for very long in case they fall into the wrong hands. Which brings us to the final point in this article.
You can stop tracking at any time by hitting the "stop tracking" button. This will invalidate your token, so you cannot be tracked by anyone (including yourself). If you subsequently start tracking again, a new token is generated, re-instating your privacy.
Closing the IGB will NOT invalidate your token. Instead, closing the IGB acts as kind of a pause function that lasts up to 8 hours. This is because your token remains valid for 8 hours after closing the IGB.
Tackling on Gates
Introduction
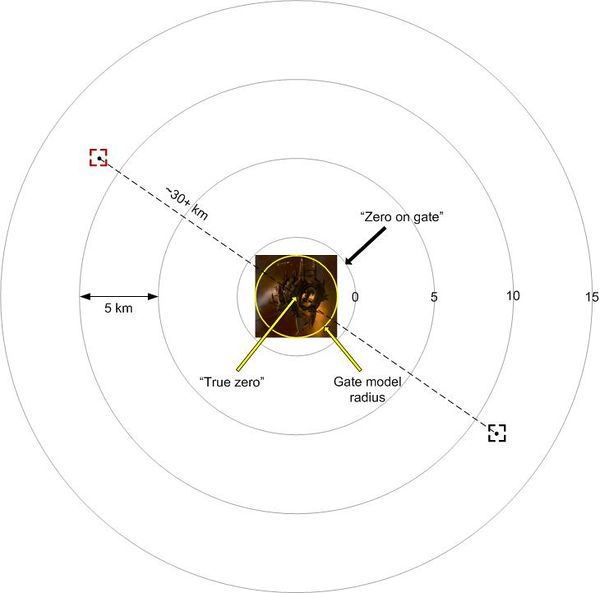
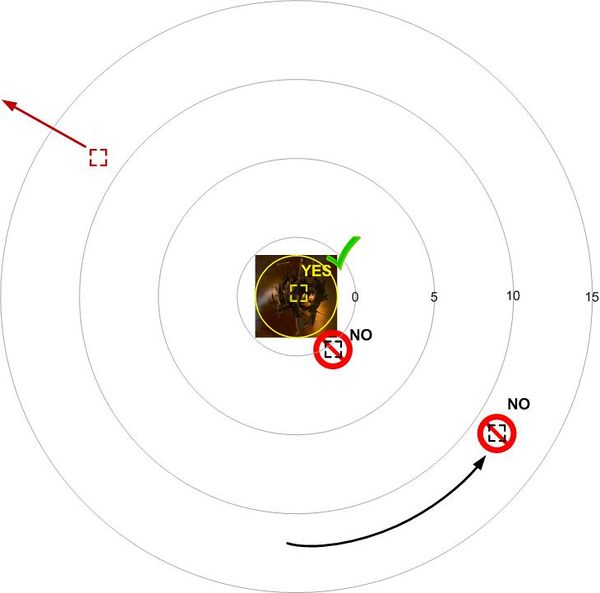
In the above diagram, we can see that the question of being "on gate" is actually quite complex. When you warp to a gate and land at or near 0 on your overview, you are at what I refer to as "zero on gate." But there is space between the gate model and this zero radius, so you can actually get closer. For example, you can power-approach gate until you bump into the model, at the gate model radius. Even then, you aren't at the center of the gate, and you can actually get even closer. For example, an intrepid frig can sometimes clamber through some gate models to sit at the absolute center, which I refer to as "true zero." Depending on the size of the gate, the distances between true zero, the gate model radius, and zero on gate can be many, many kilometers. The figure above is just an example of how the distances may look.
At this point most of you know where I'm going with this. When trying to catch stuff coming through a gate, it really matters where you position yourself in relation to the gate. I present three cases below.
Case 1: fleet coverage waiting on gates
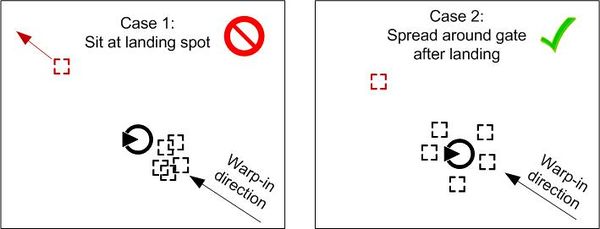
When your fleet lands on a gate, and there is any chance at all of a target jumping into system through that gate, spread yourselves around the gate, ideally at ~2500 m. DO NOT sit like unmotivated lumps at the spot you land and hope that anyone coming through will spawn close to you. Because he probably won't, and in the worst case, he will come in over 20km from you. This spreading-out behavior should be automatic, and kind of "brownian" in that it doesn't have to be perfect, but at least get better coverage than you initially had when landing.
Case 2: Interceptor behavior for tackling on gates
When you are the primary light tackle on grid (inty or other fast tackle frig) and have a long point, you should be sitting as close to true zero as possible without getting hung up on the gate model. You should NOT stay put where you land on gate, and DEFINITELY NOT orbit the gate at ANY distance. When the target drops gate cloak, you want to be reasonably equidistant from all of his possible positions. If you are orbiting gate, he will wait until you are at the far point of your orbit before decloaking. He now has two advantages in getting away: he has a better chance of being out of tackle range, and your momentum is carring you in the wrong direction to approach him quickly. This becomes even more critical when trying to decloak a target entering system.
There is a caveat for case 2, which I alluded to by saying "without getting hung up on the gate model." In most cases it is actually not desirable to be too close to true zero, even if you aren't touching the gate model. The closer you are to the gate model, the more of your pursuit vectors are cut off by the model. It is actually a matter of judgement to find the best compromise between centering yourself and still being able to approach most targets. If you have two light tacklers available to cover the gate (assuming the other side of the gate is already covered), the best option is to position yourselves on opposite sides of the gate model, either top/bottom or side to side. At this point, however, we are starting to talk about Case 1 again.
Case 3: Dictor bubbling on gates
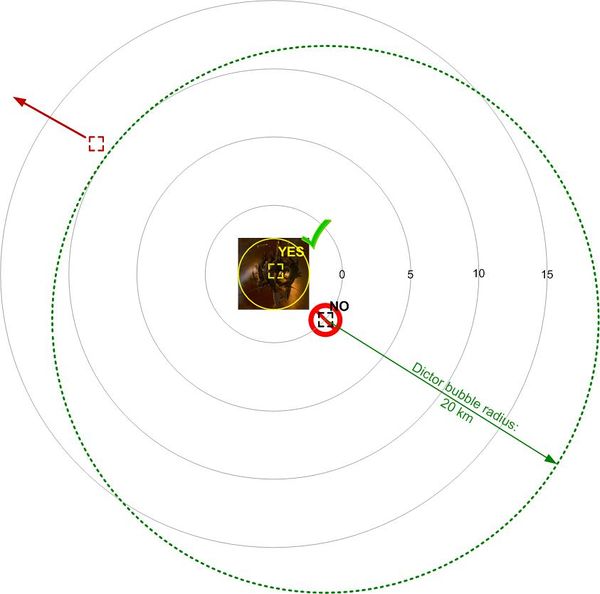
When you are the lone dictor in fleet whose primary purpose is to bubble targets jumping through a gate, you should be sitting as close to true zero as possible. And in many cases, cutting off your pursuit vectors isn't even a concern (e.g., you aren't expected to scram or shoot the target, or you plan to immediately jump through to the other side). DO NOT sit at the "zero on gate" radius, because based on my experience your odds of catching the target will be pretty bad. I can't count the number of times a dictor stays put where he lands on gate, bubbles up, and then the target decloaks outside of his bubble on the far side of the gate. A dictor's bubble radius is 20km, so bubbling up at true zero will catch all targets except on the largest gates. For situations where you have two dictors, as with the intys example above, you can put the dictors on opposite sides of the gate model for better coverage.
Conclusion: be the spider
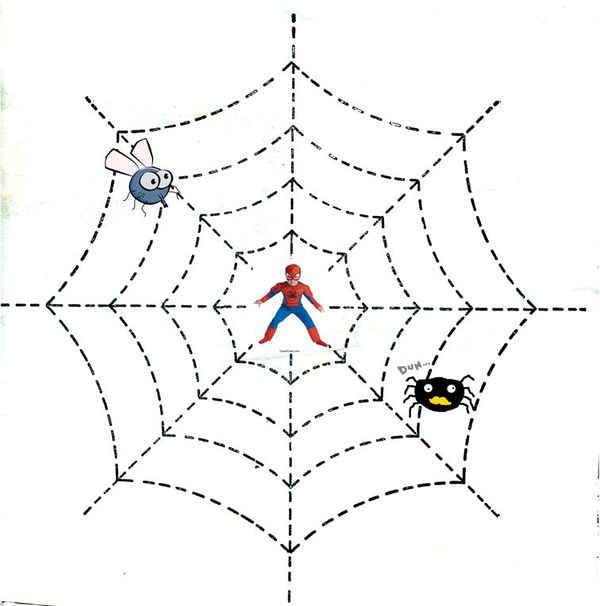
Think about it: Why do spiders sit at the center of their web?
Of course there will be exceptions to all of the above, but in general this is the best way to grab stuff on gates. There are also behaviors I didn't describe but are still valid. For example, if your fleet is large enough (think PVP-U) then it may be good to have everybody orbit gate at 12km because of the sheer density of coverage you get with 50+ ships.
