Difference between revisions of "Basic PvP Mechanics"
m (→Signature Radius) |
(→Signature Radius: Wording) |
||
| Line 56: | Line 56: | ||
* Using Skirmish Warfare links | * Using Skirmish Warfare links | ||
| − | + | Considering the lists above, we can see that increasing a ship's signature radius is generally easier than decreasing it.<br><br> | |
====Signature Resolution==== | ====Signature Resolution==== | ||
Revision as of 13:55, 14 January 2012
Original text by Sanfrey Statolomy.
Updated and expanded by Aether.
Copyright Agony Unleashed
Contents
Understanding Characteristics of Your Ship and Weapons
Signature Radius
The signature radius of your ship can be looked up in its information window. At first glance this number, measured in metres, seems to simply give players an impression of how big each ship is. However there’s much more to it than that! The signature radius of a ship influences how much damage it takes from guns and missiles, how easy the ship is to scan out, and how quickly it can be locked.
Imagine trying to throw a sandwich at a Stop sign. Easy way to do it is face on, so you’re throwing it at the front of the sign; hard way would be throwing is side-on where the sign is only a few millimeters across, and the largest target’s probably the post the sign is nailed to.
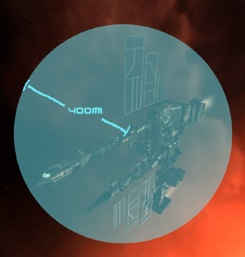
Now imagine trying to shoot a Tempest battleship. Tall and long, the Tempest should be much easier to hit ‘side on’ than from the front as it has a much larger cross section when viewed sideways (drawing 1 and 2 on diagram below). EVE does not work this way. The game sees all ships as spheres (clue lies in term 'radius'); as far as EVE is concerned your battleship is just a well-armed ball with a 400m radius as is shown on drawing 3 below.
1.2.
3.


In EVE, it’s preferable to have a small signature radius. A larger ship 'catches' more damage in combat, is easier to scan probe down, are generally slower and less agile, and ships with a smaller signature radius quickly achieve target-locks on larger ships.
It is easy to see by comparing different ships that the signature radius is relative to the ship class. Frigates and interceptors have inherently small signature radius while battleships and capital ships are much larger in comparison.
Base sizes of different ship classes assuming no other factors are affecting their sig. rad.:
- Frigates T1: 30-42 meters
- Interceptors: 30-36 meters
- Assault Frigates: 33-39 meters
- Destroyers T1&T2: 75-80 meters
- Cruisers T1&T2: 100-160 meters
- Battlecruisers T1&T2: 240-300 meters
- Battleships: 320-500 meters
- Carriers: 2,800-12,400 meters
Base sizes of drones:
- Light combat drones: 25m
- Medium combat drones: 50m
- Heavy combat drones and fighters: 100m
Factors that work to increase signature radius:
- Shield Rigs
- Shield Extenders
- Microwarpdrives (only when turned on)
- Being painted with a Target Painter
- Inertia Stabilizers
Factors that decrease signature radius:
- Training “Shield Rigging” skill - only applicable to Shield Rigs
- Training “Interceptors” skill - only applicable to Interceptors
- Training "Electronic Attack Ships" skill - only applicable to Hyena EAF
- Using Halo implants
- Using Skirmish Warfare links
Considering the lists above, we can see that increasing a ship's signature radius is generally easier than decreasing it.
Signature Resolution
All guns in Eve have an ‘area of effect’ similar to that of a shotgun, or an artillery shell. Imagine shooting a tennis ball from 30 feet away with a shotgun – sure, the ball would get blown to pieces, but it would only have been hit by a few of the pieces. Most of the pieces would have spread out a little and missed the tennis ball.
In Eve, it is easy to imagine this being the case with a blaster – after all, they spray out hot plasma and it is intuitive that it could spread. However even artillery shells in Eve have this ‘area of effect’, known as the Signature Resolution. One way to think of this is to think of the artillery shell as an explosive charge. Similar to real life artillery, they don’t simply hit target like a bullet does. They hit then explode. That explosion could be small or large, and on really big guns the explosion is really big.
Signature resolution of different turret sizes:
- Small turrets - 40 meters
- Medium turrets - 125 meters
- Large turrets - 400 meters
- Capital - 1000 meters
The Signature Resolution of a gun measures the size of this area of effect in the same way that the Signature Radius measures the size of a ship. The relationship between the two determines how much of the gun’s damage the ship will take (other factors contribute, too, though!).
Our tennis ball example above describes the situation of a “Really Big Gun” shooting a little ship. For example, a 1200mm Artillery Cannon I has a signature resolution of 400m, and a Cormorant destroyer has a Signature Radius of only 90m. Therefore the Cormorant will only be subject to a small portion of the damage that the gun is trying to deliver, as the gun’s total damage will be spread over a circle with a 400m radius, and the destroyer is only 90m in size.
In the picture below, a turret with greater signature resolution is shooting at a Malediction interceptor. Out of 15 shots placed you can see that many will miss the ship. On the other hand a turret with lower signature resolution shooting at a Caracal cruiser will be able to hit it many more times and potentially do more damage.

Explosion Radius & Velocity
The explosion radius is the missile’s equivalent to a gun’s signature resolution. In the same way that a gun has an area of effect, so does a missile. A missile will hit for reduced damage if the explosion radius is greater than the ship's signature radius. For example, a torpedo with a large explosion radius will hit for greatly reduced damage on a frigate with a small signature radius. On the other hand, a standard missile will hit for full damage against a battleship.
Another factor that decreases damage delivered by missiles is the ship's velocity. If the target's velocity is greater than the explosion velocity of the missile it will take reduced damage. This effect is combined with effects of signature radius on missile damage.
Scan Resolution
The length of time it takes for one ship to lock another is determined by the targeting ship’s scan resolution and the target's signature radius. The higher the scan resolution, the faster a ship will lock onto targets; and the higher the signature radius of a ship, the faster other ships will lock onto it. This is why a frigate can lock a battleship in very little time, but a battleship will take ten times longer to lock a frigate. The length of lock time is very important if you are trying to catch someone.
Imagine you are attempting to use a satellite to find a vehicle lost in a forest. The two things that will make it easier to find will be the resolution of the satellite’s camera, and the size of the vehicle – a fire truck will be easier to find on a high quality picture than a motorbike on a low quality picture.
- Sensor boosters improve scan resolution, allowing the ship lock other ships faster.
- Sensor dampeners decrease the target’s scan resolution, thus increasing its locking time.
Generally, Minmatar ships have the highest sensor resolution and lowest signature radius characteristics than ships of other races within the same class. This makes them be able to lock targets quicker than ships of other races, while requiring longest time to get locked back. Caldari ships generally have the lowest sensor resolution in game. Gallente and Caldari ships have the biggest signature radii in game.
This table compares the locking times of a few common ships.
These are rough numbers, using the raw ship attributes without skills applied.

Sensor Strength
A ship’s sensor strength determines how difficult the ship is to jam with ECM and how easy it is to find using scan probes. Generally speaking, Caldari ships have the highest sensor strength in game, while Minmatar ships have the lowest sensor strength, making Minmatar ships slightly easier to jam and scan down than ships of other races.
The sensor strength and signature radius of a ship both determine how easy the ship is to find using scan probes. The lower the sensor strength and the greater the signature radius, the easier the target is to scan out. For example, a rigged Vargur with only basic rigging skills will have a signature radius of 500m, and the paltry sensor strength of 11. Its signal strength will be 500 divided by 11, which equals 45. This makes Vargurs incredibly easy to scan down. In contrast the Rook has a sensor strength of 32 and a signature radius of 173, meaning its signal strength is 5 making it much more difficult to get a 100% result on.
Note: Other factors such as the distance from the probes to the target, whether the target is in dedspace, and the probing pilot’s skills also contribute to the signal strength returned on a scanner results list. A 100% signal strength is required to warp to a probed target.
ECCM modules and sensor backup arrays can be fitted to ships to increase their sensor strength, making them both more difficult to jam and more difficult to scan down. ECCM are mid-slot active modules that come in omni as well as racial varieties. Backup arrays are low-slots passive module that come only in racial varieties. When fitting a racial ECCM or backup arrray, be sure to fit the correct one for your ship type!
Amarr – Radar
Caldari – Gravimetric
Gallente – Magnetometric
Minmatar - LADAR
Formulas
For the totally obsessed amongst you, here are the formulas behind the theories above. You do not need to know this stuff!
According to Akita T, the damage formula for turrets is:
z is the "To-Hit Chance", a number between 0 (0%) and 1 (100%)
x = random number between 0 and 1 (generated for each shot)
z = 0.5^{[Angular/ModifiedTracking]^2 +[(max(0,Range-Optimal))/Falloff]^2}
where Angular = Transversal/Range, and ModifiedTracking = TurretTracking * TargetSig / GunSig
If {x<0.01} Then {quality = 3} else {quality = x + 0.5}
If {x<z} Then {damage = quality x expected base damage} Else {missed shot}
In not so many words, what this means, is that :
* DPS goes down a lot faster as chance to hit does
* chance to hit is never 100% whenever any transversal is involved
* within optimal, after sig adjustments, if "adjusted turret tracking" equals target's angular velocity, you only have a 50% chance to hit, and you deal a bit under 40% DPS overall
* you can get hit in a fast, small ship by a large gun with lousy tracking... it just has a very low chance to hit (but not zero)
According to Stafen, the damage formula for missiles is:
Damage = Base_Damage x MIN(MIN(sig/Er,1) , (Ev/vel x sig/Er)^(K x ln(drf)))
Where
sig = ship's signature radius
vel = ship's velocity
Er = Explosion Radius of missile
Ev = Explosion Velocity of missile
K ≈ 0.586
drf = damage reduction factor which changes according to missile type
drf for T1 missile types:
light = 2.8
rocket = 3.0
heavy = 3.2
heavy assault = 4.5
cruise = 4.5
torpedo = 5.0
According to Blazde, the time it takes for one ship to lock another is determined by:
seconds = ((40000 / ScanRes) / (asinh(SigRadius) ^ 2))
According to Trillian McMillan, the percent chance for ECM to work is:
(ECM jamming strength for the target's sensor type) / (target ship's sensor strength) x 100
Example: 6 point of radar jamming strength / 20 sensor strength on Apocalypse x 100 = 30% chance to jam it on first cycle
Multiple ECM formula (multiple modules/cycles):
Chance_to_jam = {1-[(1-E1)*(1-E2)*...*(1-En)]}*100 With E1, E2... En being each of your jammers' chance to jam the ship.
If all your jammers are equal, E1=E2=En, then this formula is simplified to:
Chance_to_jam = {1-[(1-E)^n]}*100
n being your number of jammers on the target.